
Step-By-Step Guides
3D Hoof Care
Learn how to maintain healthy hooves for your equine athlete utilizing our 3D pads


Mark the Pad for Trimming
Begin by placing the orthopedic pad beneath the horseshoe, ensuring it is properly aligned. Once the pad is positioned, use a marker to trace the outline of the horseshoe onto the pad. This traced line will serve as a precise guide for trimming the pad to fit the shoe.
Additionally, draw a straight line down the center of the horseshoe. This reference line is crucial for ensuring the pad remains correctly aligned during the fitting process, helping to maintain balance and support for the horse’s hoof.
Trim the Pad Around the Horseshoe Clips
After marking the pad, the next step is to make initial trims on both sides of the pad to accommodate the clips on the horseshoe. These clips protrude from the shoe and can prevent the pad from sitting flush against it.
By carefully cutting out sections of the pad around the clips, you ensure that the pad will fit seamlessly against the shoe, providing the necessary support and alignment for the horse’s hoof. This step is crucial for achieving a precise fit before trimming the rest of the pad to the shoe’s outline.
Trim the Pad to Fit the Horseshoe
With the initial cuts made around the clips, it’s time to trim the rest of the pad to match the shape of the horseshoe. Using a pair of sharp cutters, carefully follow the edge of the shoe, cutting as close to the outline as possible.
This precise trimming ensures that the pad will fit perfectly against the horseshoe, providing optimal support without any excess material that could cause discomfort or misalignment. Take your time with this step to achieve a clean and accurate fit.
Secure the Pad with Nails
Once the pad is trimmed to fit the horseshoe, it’s important to secure it in place before attaching it to the horse’s hoof. To do this, guide two nails through the pad on either side of the horseshoe. These nails will help hold the pad steady, ensuring it doesn’t shift or move during the fitting process.
This step is crucial for maintaining the correct alignment of the pad, allowing for a secure and comfortable fit when applying the horseshoe to the horse’s hoof.
Clip and Flatten the Securing Nails
After securing the pad to the horseshoe with nails, the next step is to clip the excess length of the nails. Use a nail clipper to carefully trim the nails down so they are no longer protruding. Once clipped, ensure that the remaining nail ends sit flush with the pad.
This step is essential to prevent any sharp edges from causing discomfort or interfering with the fit of the horseshoe on the hoof, ensuring a smooth and secure attachment.
Verify Pad Alignment
Before proceeding further, it’s essential to check and verify that the pad is correctly aligned with the horseshoe. Ensure that the pad follows the contours of the shoe and that all edges are evenly aligned. The centerline marked earlier should match up perfectly with the center of the shoe.
This alignment is critical for proper distribution of pressure and for ensuring the pad provides the intended support and protection for the horse’s hoof. Take a moment to adjust the pad if necessary, ensuring everything is in its proper place before moving on.
Apply DIM (Silicone Impression Material)
Now that the pad is properly aligned, the next step is to apply DIM, a silicone impression material, onto the horse’s hoof. Carefully place the DIM into the bar and frog crevices, as shown in the photo, ensuring that it fills these areas adequately. The amount of DIM you use will depend on the size of the pad, the type of pad, and the depth of the horse’s sole.
It’s important to apply enough material to provide a secure and supportive cushion, but not so much that it overflows or interferes with the fit of the pad. This step helps to ensure the pad stays in place and provides the necessary support and comfort for the horse’s hoof.
Position the Shoe and Pad, Secure with Nails
With the DIM applied, carefully position the horseshoe and pad onto the horse’s hoof. Begin securing the shoe in place by driving nails through the designated holes in the shoe, anchoring it firmly to the hoof. While the DIM is still soft, gently set the horse’s foot down and lift the opposite limb to allow the horse to bear weight on the foot with the shoe and pad. This step is crucial as it will help squeeze out any excess DIM, ensuring a proper fit.
If excess material isn’t removed, the cured DIM could harden and create uncomfortable pressure points within the hoof, potentially leading to discomfort or lameness. This process ensures that the pad and DIM conform perfectly to the hoof’s shape, providing optimal comfort and support.
Remove Excess DIM While Soft
Before the DIM fully cures, it's essential to remove any excess material that may have been squeezed out during the previous step. Use a tool or your hands to carefully clean away the extra DIM while it’s still soft and pliable. This step is important because once the DIM hardens, it becomes much more difficult to remove or smooth out, potentially leaving rough or uneven areas that could cause discomfort.
By ensuring all excess material is removed now, you help maintain a smooth, comfortable surface that will contribute to the horse's overall hoof health and comfort.
Final Check of Fit and Finish
After completing all previous steps, gently set the horse’s foot down and carefully inspect the fit and finish of the shoe and pad. Ensure that the shoe is securely in place and that the pad aligns perfectly with the contours of the hoof. Check for any remaining excess DIM and confirm that the pad sits flush with the shoe, without any gaps or unevenness.
This final step is crucial to ensure the horse's comfort and to verify that the shoeing process has been completed correctly. A well-fitted shoe and pad will provide the necessary support and protection, promoting healthy hoof function and overall equine well-being.
HoofCast Guide
Learn how to maintain healthy hooves for your equine athlete utilizing our HoofCast product

Preparation and glue application
Dress the hoof lightly and apply glue around the hoof with a liberal amount at the heels as these are the anchor points
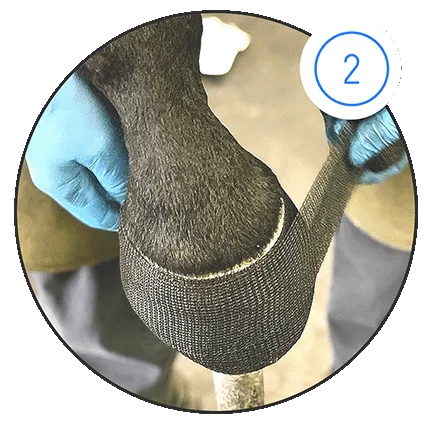
Applying the cast
Once your glue is applied start wrapping your cast around the hoof. In order to have wider quarters for nailing and not create a longer toe, I normally double back on my casting at the quarter. Do a full wrap every 2-3 turns to hold the cast in place
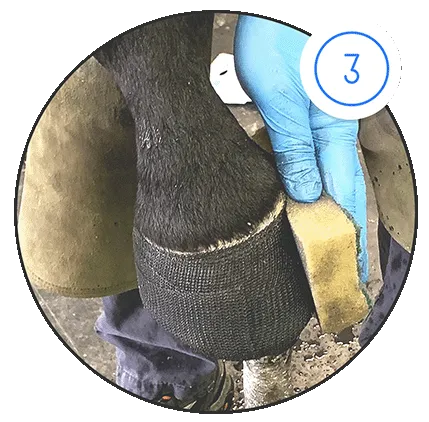
Apply Water
Use a sponge and lightly wet the entire cast you have applied. The water and exposure to air are what is needed for casting material to set hard
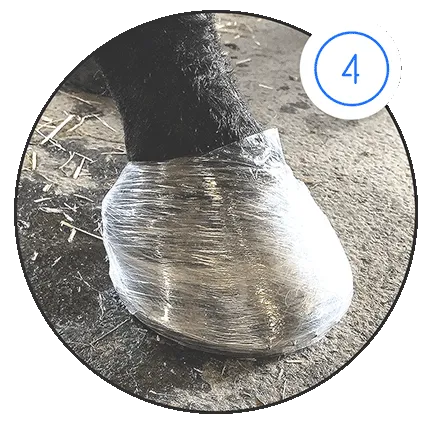
Plastic wrap
Plastic wrap the hoof extensively to hold the cast in position until the glue and cast have cured.
The cast will start curing after 5 minutes and fully set after 20 minutes and the warmer the weather the faster it will set.
Should the cast be dry and not fully set then sponge with water again and wrap until it cures
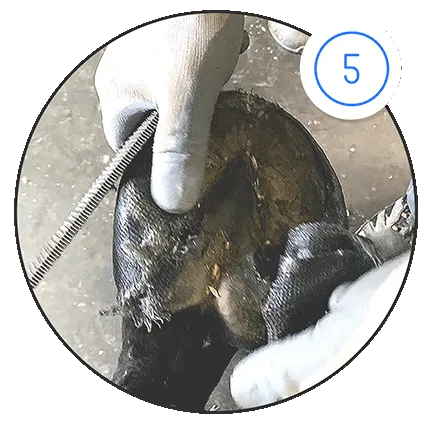
Remove heel section
It is important to remove this heel section as it will constrict normal hoof movement.
If you have to leave it in, please ensure it is less than 3 layers thick and does not stay full for more than 10 days.
If your horse is confined than the full shoeing period is fine

Nailing
Nail to the cast as if you have a thick walled horse.
You do not need to block your nails or undercut your clinches as the material accepts the bedded clinch very nicely
3D Hoof Pad Application
The following video shows the step-by-step procedure for applying a 3D Hoof Pad to horse
Quick Hoof Casting Demo
The following video shows the step-by-step process of applying HoofCast to a horse
HoofCast and Plating
The following video shows the step-by-step guide to applying HoofCast and plating a racehorse