filterdiff Command in Linux
The filterdiff command in Linux manipulates and processes patch files. It is essentially used to include or exclude a specific part of the patch or diff file based on the specified pattern.
The filterdiff command is beneficial in cases when only selective changes are required. The developer can review the specific portion of the patch file by extracting it or cleaning the unnecessary lines.
Table of Contents
Here is a comprehensive guide to the options available with the filterdiff command −
- Prerequisites to Use filterdiff Command
- Syntax of filterdiff Command
- filterdiff Command Options
- Examples of filterdiff Command in Linux
Prerequisites to Use filterdiff Command
The filterdiff command may not be included in Linux distributions by default. To use the filterdiff command, it needs to be installed. To view whether it is installed or not, use the following command −
filterdiff --version

If the above command shows the version, then it is installed. If it does not show any output, then use the following instructions to install it.
The filterdiff command is a part of the patchutils suite. The patchutils offers various command-line utilities to work with patches.
To install the patchutils package on Ubuntu, Kali Linux, Raspberry Pi OS, Debian, and other Debian-based distributions, use the following command −
sudo apt install patchutils
To install it on Arch Linux, use −
sudo pacman -S patchutils
To install the patchutils package on CentOS, use the following command −
sudo yum install patchutils
To install it on Fedora, use the following command −
sudo dnf install patchutils
Syntax of filterdiff Command
The syntax of the Linux filterdiff command is as follows −
filterdiff [options] [patchfile]
The [options] field is used to specify the options to modify the commandâs behavior. The [patchfile] field is used to specify the patch files that need to be processed.
filterdiff Command Options
The options of the filterdiff command are listed below −
| Flags | Options | Description |
|---|---|---|
| -i pattern | --include | To include only files that match specified pattern (suppresses other lines) |
| -I | --include-from-file | To include only files that match the pattern specified in the file (suppresses other lines) |
| -x | --exclude | To exclude only files that match specified pattern (displays other lines) |
| -X | --exclude-from-file | To exclude only files that match the pattern specified in the file (displays other lines) |
| -p | --stripe-match | To ignore the specified number of components of pathname when matching files |
| -# | --hunks | To include only specific hunks based on their numbers |
| --lines | To Include only hunks that affect specific lines in the original files | |
| --files | To include only specific files based on their order in the patch | |
| --annotate | To annotate the hunks with the filename or hunk number | |
| --format | To choose between the unified or context formats for the output | |
| --addprefix | To add a prefix to all pathnames in the output | |
| --addoldprefix | To add a prefix only to old (original) file paths | |
| --addnewprefix | To add a prefix only to new (updated) file paths | |
| --as-numbered-lines | To display the lines of selected hunks with their line numbers | |
| --remove-timestamps | To skip including the timestamps in the output | |
| -v | --verbose | To get the detailed output |
| --clean | To remove the non-diff (comments) lines from the output | |
| -z | --decompress | To decompress the -gz and .bz2 files |
| --help | To display the command help | |
| --version | To display the command version | |
| --list | It runs as lsdiff | |
| --grep | It runs as grepdiff |
Examples of filterdiff Command in Linux
This section demonstrates the usage of the filterdiff command in Linux with examples.
The sample patch file that will be used in the following examples is given below −

- Including and Displaying Specific File Patches
- Excluding and Displaying Specific File Patches
- Annotating Hunks
- Displaying the Specific Patch Hunks
- Removing the Non-Diff Lines
- Displaying Selected Hunk Lines with Line Numbers
- Removing Timestamps
- Listing Patch Files
Including and Displaying Specific File Patches
Use the -i or --include options to display specific file patches. For example, to display the changes related to the example.c file, use the filterdiff command in the following way −
filterdiff -i 'example.c' example.patch

The command will only include the diffs for example.c.
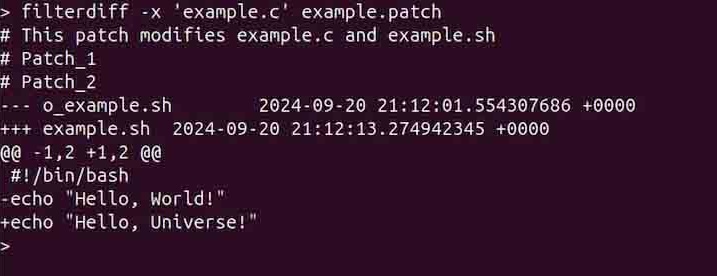
Excluding and Displaying Specific File Patches
To exclude and display the specific file patches, use the -x or --exclude option −
filterdiff -x 'example.c' example.patch
Annotating Hunks
To annotate each hunk with the file name and hunk number, use the --annotate option −
filterdiff --annotate example.patch

Displaying the Specific Patch Hunks
To display the specific patch hunk, use the -# or --hunks options. Two hunks can be seen in the following patch file.

To display the second hunk, use the following command −
filterdiff -#2 multi.patch

Removing the Non-Diff Lines
The comments are considered non-diff lines in patch files. The comments can be seen in the patch file given below −

The comments in the patch files start with # sign.
To remove the non-diff lines from the patch files, use the --clean option
filterdiff --clean example.patch

Displaying Selected Hunk Lines with Line Numbers
Instead of displaying patch fragments, displaying only lines of the selected hunk with line numbers before or after the patch is applied, use the --as-numbered-lines option −
filterdiff --as-numbered-lines=before example.patch

Removing Timestamps
To remove the timestamps from the output, use the --remove-timestamps option −
filterdiff --remove-timestamps example.patch

Listing Patch Files
To list filenames that are modified, use the --list option −
filterdiff --list example.patch

To show the line number in the patch file where the patch begins, use the -n option −
filterdiff --list -n inc.patch

Conclusion
The filterdiff command in Linux is used to process patch files. It is a handy tool to review the combined patch files. It offers various options for modifying the commandâs output.
The filterdiff command is a part of the patchutils package. Therefore, the patchutils package must be installed to use it.