How to Implement Basic Angular Routing and Nested Routing With Params in Angular v11
0 likes54 views

The document provides a step-by-step guide on implementing basic and nested routing with parameters in Angular v11, including setting up a new Angular project and configuring routing components. It covers commands for creating components, setting up routes, and the use of ActivatedRoute for dynamic parameters. Additionally, the document offers a GitHub repository for users to clone and practice the demonstrated features.


![AppComponent,
HomeComponent,
MarvelMoviesComponent,
DCMoviesComponent,
],
imports: [
BrowserModule,
AppRoutingModule,
NgbModule
],
providers: [],
bootstrap: [AppComponent]
})
export class AppModule { }
Moving towards the next section, i.e., Basic
Angular routing.](https://image.slidesharecdn.com/howtoimplementbasicangularroutingandnestedroutingwithparamsinangularv11-210303101612/85/How-to-Implement-Basic-Angular-Routing-and-Nested-Routing-With-Params-in-Angular-v11-20-320.jpg)


![},
{
path: 'marvel-movies',
component: MarvelMoviesComponent
},
{
path: 'dc-movies',
component: DCMoviesComponent,
},
];
@NgModule({
imports: [RouterModule.forRoot(routes)],
exports: [RouterModule]
})
export class AppRoutingModule { }](https://image.slidesharecdn.com/howtoimplementbasicangularroutingandnestedroutingwithparamsinangularv11-210303101612/85/How-to-Implement-Basic-Angular-Routing-and-Nested-Routing-With-Params-in-Angular-v11-24-320.jpg)


![app.component.html
<div class="container">
<nav class="navbar navbar-expand-lg
navbar-light bg-light">
<div class="collapse navbar-collapse
header-nav" id="navbarNav">
<ul class="navbar-nav" >
<li class="nav-item" >
<a class="nav-link" [routerLink]="
['/home']">
Home
</a >
</li>
<li class="nav-item">
<a class="nav-link" [routerLink]="
['/marvel-movies']">
Marvel Movies
</a>
</li>
<li class="nav-item">
<a class="nav-link" [routerLink]="['/dc-
movies']">](https://image.slidesharecdn.com/howtoimplementbasicangularroutingandnestedroutingwithparamsinangularv11-210303101612/85/How-to-Implement-Basic-Angular-Routing-and-Nested-Routing-With-Params-in-Angular-v11-27-320.jpg)


![Marvel-movies
marvel-movies.component.ts ->Define a
static array of movie objects.
marvel-movies.component.ts
import { Component, OnInit } from
'@angular/core';
@Component({
selector: 'app-marvel-movies',
templateUrl: './marvel-
movies.component.html',
styleUrls: ['./marvel-
movies.component.css']
})
export class MarvelMoviesComponent
implements OnInit {
public movies = [
{](https://image.slidesharecdn.com/howtoimplementbasicangularroutingandnestedroutingwithparamsinangularv11-210303101612/85/How-to-Implement-Basic-Angular-Routing-and-Nested-Routing-With-Params-in-Angular-v11-35-320.jpg)
![id: "1",
name: "CAPTAIN AMERICA: THE FIRST
AVENGER",
},
{
id: "2",
name: "DOCTOR STRANGE",
},
{
id: "3",
name: "IRON MAN",
}
]
constructor() { }
ngOnInit(): void {
}
}](https://image.slidesharecdn.com/howtoimplementbasicangularroutingandnestedroutingwithparamsinangularv11-210303101612/85/How-to-Implement-Basic-Angular-Routing-and-Nested-Routing-With-Params-in-Angular-v11-36-320.jpg)
![marvel-movies.component.html -> Display
each movie by using *ngFor.
marvel-movies.component.html
<div *ngFor="let movie of movies; let i =
index">
<button type="button"
class="btn btn-primary btn-lg btn-block"
[routerLink]="movie.id"
[state]="movie"
>
{{movie.name}}
</button>
</div>](https://image.slidesharecdn.com/howtoimplementbasicangularroutingandnestedroutingwithparamsinangularv11-210303101612/85/How-to-Implement-Basic-Angular-Routing-and-Nested-Routing-With-Params-in-Angular-v11-37-320.jpg)
![You can apply same code in the files (dc-
movies.component.html, dc-
movies.component.ts) of the component dc-
movies
2. Modifying the file of Movie detail
component
movie-detail.component.ts
import { Component, OnInit } from
'@angular/core';
import { ActivatedRoute } from
'@angular/router';
@Component({
selector: 'app-movie-detail',
templateUrl: './movie-
detail.component.html',
styleUrls: ['./movie-detail.component.css']
})](https://image.slidesharecdn.com/howtoimplementbasicangularroutingandnestedroutingwithparamsinangularv11-210303101612/85/How-to-Implement-Basic-Angular-Routing-and-Nested-Routing-With-Params-in-Angular-v11-38-320.jpg)


![path: 'marvel-movies',
children: [
{
path: '',
component: MarvelMoviesComponent
},
{
path: ':id',
component: MovieDetailComponent
}
]
},
{
path: 'dc-movies',
children: [
{
path: '',
component: DCMoviesComponent,
},
{
path: ':id',
component: MovieDetailComponent](https://image.slidesharecdn.com/howtoimplementbasicangularroutingandnestedroutingwithparamsinangularv11-210303101612/85/How-to-Implement-Basic-Angular-Routing-and-Nested-Routing-With-Params-in-Angular-v11-43-320.jpg)
![}
]
},
];
@NgModule({
imports: [RouterModule.forRoot(routes)],
exports: [RouterModule]
})
export class AppRoutingModule { }](https://image.slidesharecdn.com/howtoimplementbasicangularroutingandnestedroutingwithparamsinangularv11-210303101612/85/How-to-Implement-Basic-Angular-Routing-and-Nested-Routing-With-Params-in-Angular-v11-44-320.jpg)


How to Implement Basic Angular Routing and Nested Routing With Params in Angular v11
- 1. How to Implement Basic Angular Routing and Nested Routing With Params in Angular v11 www.bacancytechnology.com
- 2. Table of Index 1. Introduction 2. Goal 3. Github Repository for Angular routing example 4. Install Angular CLI 5. Create and configure the Angular project 6. Implement Basic Angular Routing in Angular Version 11 7. Nested Angular Routing and Angular Routing with Params in Angular v11 8. Conclusion
- 3. Introduction
- 4. When you are going through any website, have you ever wondered why and how you are redirected to the Home page and not the About Us page while clicking the home link? The whole mechanism that decides what should be displayed when the user takes action is termed routing. You might be familiar with the jargon if you have already worked with any front-end frameworks. Even if you haven’t, then that’s completely fine; because this blog will help you with steps to implement Angular routing and a Github repo also to come out of your ‘beginner zone.’
- 5. Let’s get started with How Routing Works in Angular 11.
- 6. Goal
- 7. Before knowing how to build, let’s know what to build. Here’s the video of demo which we would be developing in this blog-
- 9. Click here to visit the Github Repository OR Open Terminal and run this command to clone the repository git clone https://github.com/architanayak/angular- routing.git Okay, so now you’re aware of what are we developing, and as a bonus, you have a github repository to clone and play around with the demo. Let’s start the steps from installing the Angular project to implement the Angular routing in Angular version 11.
- 11. Use the below-mentioned command to install the latest version of Angular CLI in your system. Globally- npm install -g @angular/cli Locally- npm install @angular/cli To verify the installation, run the following command- ng --version
- 12. The command will show you the version of Angular that you’ve just installed. You will see something like this on your terminal.
- 14. After the installation is done, we will create a brand new Angular project and configure it accordingly. ng new demo-app NOTE- You can name it whatever you want instead of demo-app Answer the series of questions, and you will successfully create your project. Make sure that you choose YES for – Would you like to add Angular routing? ⦿Create an Angular project.
- 15. Need support for routing and navigation in Angular 11? Hire Angular developers from us to keep your Angular project up-to-date, implementing latest features to the stable release. Implement Now
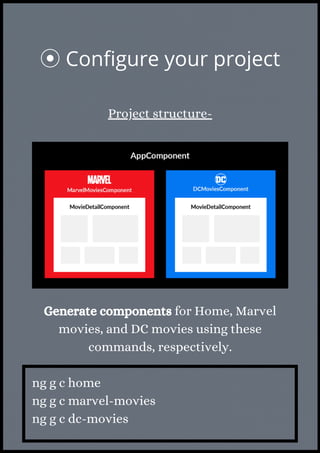
- 16. Project structure- Generate components for Home, Marvel movies, and DC movies using these commands, respectively. ng g c home ng g c marvel-movies ng g c dc-movies ⦿Configure your project
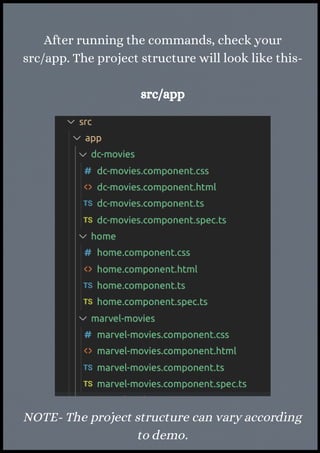
- 17. After running the commands, check your src/app. The project structure will look like this- src/app NOTE- The project structure can vary according to demo.
- 18. npm install bootstrap --save npm install --save @ng-bootstrap/ng- bootstrap ng add @ng-bootstrap/ng-bootstrap Once you have implemented all the above commands open app.module.ts, and you’ll notice that the components and ng- bootstrap library has been imported and declared automatically. ⦿Install ng-bootstrap –
- 19. app.module.ts import { NgModule } from '@angular/core'; import { BrowserModule } from '@angular/platform-browser'; import {NgbModule} from '@ng- bootstrap/ng-bootstrap'; import { AppRoutingModule } from './app- routing.module'; import { AppComponent } from './app.component'; import { HomeComponent } from './home/home.component'; import { MarvelMoviesComponent } from './marvel-movies/marvel- movies.component'; import { DCMoviesComponent } from './dc- movies/dc-movies.component'; @NgModule({ declarations: [
- 20. AppComponent, HomeComponent, MarvelMoviesComponent, DCMoviesComponent, ], imports: [ BrowserModule, AppRoutingModule, NgbModule ], providers: [], bootstrap: [AppComponent] }) export class AppModule { } Moving towards the next section, i.e., Basic Angular routing.
- 22. We will be changing these two files- ⦾ app-routing.module.ts ⦾ app.component.html ⦾ app-routing.module.ts In this file we will declare route with their respective components. So, the application would know which component has to be rendered on which route.
- 23. app-routing.module.ts import { NgModule } from '@angular/core'; import { RouterModule, Routes } from '@angular/router'; import { HomeComponent } from './home/home.component'; import { MarvelMoviesComponent } from './marvel-movies/marvel- movies.component'; import { DCMoviesComponent } from './dc- movies/dc-movies.component'; const routes: Routes = [ { path: '', redirectTo: '/home', pathMatch: 'full', }, { path: 'home', component: HomeComponent,
- 24. }, { path: 'marvel-movies', component: MarvelMoviesComponent }, { path: 'dc-movies', component: DCMoviesComponent, }, ]; @NgModule({ imports: [RouterModule.forRoot(routes)], exports: [RouterModule] }) export class AppRoutingModule { }
- 25. Explanation- { path: '', redirectTo: '/home', pathMatch: 'full', }, Due to this above-mentioned code snippet, the site will be redirected to ‘/home’ when the application is launched, i.e., the component will render at ‘/home’ as your default page. { path: 'home', component: HomeComponent, },
- 26. This code snippet indicates that HomeComponent is displayed on URL ‘/home’ The logic works same for other two components – MarvelMoviesComponent and DCMoviesomponent ⦾ app.component.html The components are always rendered with the help of Router-Outlet of the parent component. And as app.component.html is the parent component of all the components, we will have the links for home page, marvel movies page, and dc movies page here.
- 27. app.component.html <div class="container"> <nav class="navbar navbar-expand-lg navbar-light bg-light"> <div class="collapse navbar-collapse header-nav" id="navbarNav"> <ul class="navbar-nav" > <li class="nav-item" > <a class="nav-link" [routerLink]=" ['/home']"> Home </a > </li> <li class="nav-item"> <a class="nav-link" [routerLink]=" ['/marvel-movies']"> Marvel Movies </a> </li> <li class="nav-item"> <a class="nav-link" [routerLink]="['/dc- movies']">
- 28. DC Movies </a> </li> </ul> </div> <span class="navbar-brand">Angular 11 Routing</span> </nav> </div> <router-outlet ></router-outlet>
- 29. Open the localhost and try whether you’ve done the routing correctly or not. It should be something like this (omitting the design part)-
- 30. NOTE: Here, I have changed the text in dc- movies.component.html and marvel- movies.component.html. You might see the default texts for both components. And plus, to keep it simple for beginners I have not made a common component for Marvel and DC rather I have used similar codes for both the components. You can choose to create a single component for both. So, this was an example and explanation of Basic Angular routing. Now, taking one more step ahead and see how to implement Nested Routing and Routing with params.
- 31. We are going to give you an Offer, That you can’t resist… Hire Dedicated Angular Developer & Start Your Free Trial Now!
- 32. Nested Angular Routing and Angular Routing with Params in Angular v11
- 33. Run below mentioned command to create MovieDetail component. ng g c movie-detail
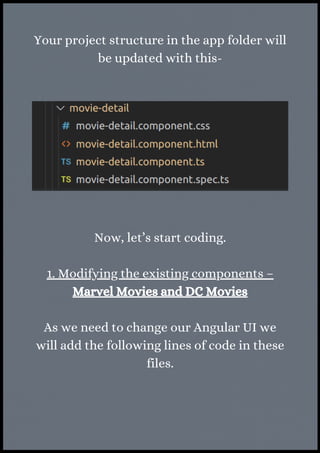
- 34. Your project structure in the app folder will be updated with this- Now, let’s start coding. 1. Modifying the existing components – Marvel Movies and DC Movies As we need to change our Angular UI we will add the following lines of code in these files.
- 35. Marvel-movies marvel-movies.component.ts ->Define a static array of movie objects. marvel-movies.component.ts import { Component, OnInit } from '@angular/core'; @Component({ selector: 'app-marvel-movies', templateUrl: './marvel- movies.component.html', styleUrls: ['./marvel- movies.component.css'] }) export class MarvelMoviesComponent implements OnInit { public movies = [ {
- 36. id: "1", name: "CAPTAIN AMERICA: THE FIRST AVENGER", }, { id: "2", name: "DOCTOR STRANGE", }, { id: "3", name: "IRON MAN", } ] constructor() { } ngOnInit(): void { } }
- 37. marvel-movies.component.html -> Display each movie by using *ngFor. marvel-movies.component.html <div *ngFor="let movie of movies; let i = index"> <button type="button" class="btn btn-primary btn-lg btn-block" [routerLink]="movie.id" [state]="movie" > {{movie.name}} </button> </div>
- 38. You can apply same code in the files (dc- movies.component.html, dc- movies.component.ts) of the component dc- movies 2. Modifying the file of Movie detail component movie-detail.component.ts import { Component, OnInit } from '@angular/core'; import { ActivatedRoute } from '@angular/router'; @Component({ selector: 'app-movie-detail', templateUrl: './movie- detail.component.html', styleUrls: ['./movie-detail.component.css'] })
- 39. export class MovieDetailComponent implements OnInit { public movieId; public movieData; constructor(private activatedRoute: ActivatedRoute) { } ngOnInit() { // to access data of movie this.movieData = history.state // to access params this.movieId = this.activatedRoute.snapshot.params.id; console.log("Params movieId", this.movieId); } }
- 40. You might have guessed from the above snippet, what’s the exact use of ActivatedRoute. But if not, do not worry. Basically, ActivatedRoute helps us to get the route data. Suppose, if a situation arises, that we want to have a dynamic parameter in a route. For eg: /users/1 , /users/2 …. So here the /users/ is common, but the id gets updated. And if I want to fetch the data user-wise, we need to fetch the id from the URL. So to handle such scenarios, ActivatedRoute comes as a rescue. We can access route data in two ways : Explanation: * Using Snapshot * Using Observable (Subscribe). I have shown (1) in the above snippet.
- 41. Use the Snapshot if you are pretty sure that you need an initial value of the parameter and the value would not change from the same component. As the name suggests, it would give you a snapshot of the initial value and would not catch the change after it. Use the Observable if there are chances of change in the value of the parameter from the same component. As we are using observable, it would catch each change till we unsubscribe from it. If you are not sure about which to use, the safest option is to use the Observable. You can use history.state to access the information about the selected movie and display it. Rather than that, if you have a different .json file, you can get the id from activatedRoute (here movieId) and then filter the data based on the id.
- 42. 3. Modifying the file related to Routing app-routing.module.ts Import this – import { MovieDetailComponent } from './movie-detail/movie-detail.component'; Change the routes for Marvel and DC movies- const routes: Routes = [ { path: '', redirectTo: '/home', pathMatch: 'full', }, { path: 'home', component: HomeComponent, }, {
- 43. path: 'marvel-movies', children: [ { path: '', component: MarvelMoviesComponent }, { path: ':id', component: MovieDetailComponent } ] }, { path: 'dc-movies', children: [ { path: '', component: DCMoviesComponent, }, { path: ':id', component: MovieDetailComponent
- 44. } ] }, ]; @NgModule({ imports: [RouterModule.forRoot(routes)], exports: [RouterModule] }) export class AppRoutingModule { }
- 45. children attribute consist of various child routes, which you want to add after /marvel-movies. When the URL matches route /marvel- movies, MarvelMoviesComponent is displayed because of this – Explanation – { path: '', component: MarvelMoviesComponent },
- 46. When the URL matches route- /marvel- movies/:id, MovieDetailComponent is displayed because of this- { path: ':id', component: MovieDetailComponent } You can apply the same lines of code for DC movies component too. Your localhost will look something like this if you have implemented the code as directed above (omitting the design part).
- 47. So far, so good? This was all about Basic Angular Routing and Nested Angular Routing, and Angular Routing with params in Angular v11. In next blog, I will let you know how to load the routes lazily.
- 48. Even after developing various demo you might need help when you want to implement Angular app router in Angular v11 for large-scaled Angular projects. And for that, we are to lend a helping hand. Without wasting a single minute connect to Bacancy Technology to work with best Angular developers. To fulfill your varied project requirements, we let you hire Angular developer from us at your convenience who have in-depth knowledge and extensive expertise in dealing with all the shapes and sizes of Angular projects. Conclusion