Spring Boot 3.0 - JWT Authentication with Spring Security using MySQL Database
Last Updated :
23 Jul, 2025
In Spring Security 5.7.0, the Spring team deprecated the WebSecurityConfigurerAdapter, as they encourage users to move towards a component-based security configuration. Spring Boot 3.0 has come with many changes in Spring Security. In this article, we are going to learn how to implement JWT authentication and authorization in a Spring Boot 3.0 application using Spring Security 6 with MySQL Database.
Demo Project
Step 1: Create a New Spring Boot Project in Spring Initializr
To create a new Spring Boot project, please refer to How to Create a Spring Boot Project in Spring Initializr and Run it in IntelliJ IDEA . For this project, choose the following things:
- Project: Maven
- Language: Java
- Packaging: Jar
- Java: 17
Please choose the following dependencies while creating the project.
- Spring Web
- Spring Security
- MySQL Driver
- Spring Data JPA
- Lombok
Additionally, we have added dependencies for JWT also. Below are the dependencies
<dependency>
<groupId>io.jsonwebtoken</groupId>
<artifactId>jjwt-api</artifactId>
<version>0.11.5</version>
</dependency>
<dependency>
<groupId>io.jsonwebtoken</groupId>
<artifactId>jjwt-impl</artifactId>
<version>0.11.5</version>
</dependency>
<dependency>
<groupId>io.jsonwebtoken</groupId>
<artifactId>jjwt-jackson</artifactId>
<version>0.11.5</version>
</dependency>
Below is the complete pom.xml file. Please cross-verify if you have missed some dependencies.
XML
<?xml version="1.0" encoding="UTF-8"?>
<project xmlns="https://maven.apache.org/POM/4.0.0"
         xmlns:xsi="https://www.w3.org/2001/XMLSchema-instance"
         xsi:schemaLocation="https://maven.apache.org/POM/4.0.0 https://maven.apache.org/xsd/maven-4.0.0.xsd">
    <modelVersion>4.0.0</modelVersion>

    <parent>
        <groupId>org.springframework.boot</groupId>
        <artifactId>spring-boot-starter-parent</artifactId>
        <version>3.0.8</version>
        <relativePath/> <!-- lookup parent from repository -->
    </parent>

    <groupId>com.gfg</groupId>
    <artifactId>springboot3-security</artifactId>
    <version>0.0.1-SNAPSHOT</version>
    <name>springboot3-security</name>
    <description>Demo project for Spring Boot 3 Security</description>

    <properties>
        <java.version>17</java.version>
        <jjwt.version>0.11.5</jjwt.version>
    </properties>

    <dependencies>
        <dependency>
            <groupId>org.springframework.boot</groupId>
            <artifactId>spring-boot-starter-data-jpa</artifactId>
        </dependency>
        <dependency>
            <groupId>org.springframework.boot</groupId>
            <artifactId>spring-boot-starter-security</artifactId>
        </dependency>
        <dependency>
            <groupId>org.springframework.boot</groupId>
            <artifactId>spring-boot-starter-web</artifactId>
        </dependency>

        <dependency>
            <groupId>com.mysql</groupId>
            <artifactId>mysql-connector-j</artifactId>
            <scope>runtime</scope>
        </dependency>
        <dependency>
            <groupId>org.projectlombok</groupId>
            <artifactId>lombok</artifactId>
            <optional>true</optional>
        </dependency>
        <dependency>
            <groupId>org.springframework.boot</groupId>
            <artifactId>spring-boot-starter-test</artifactId>
            <scope>test</scope>
        </dependency>
        <dependency>
            <groupId>org.springframework.security</groupId>
            <artifactId>spring-security-test</artifactId>
            <scope>test</scope>
        </dependency>
        <dependency>
            <groupId>io.jsonwebtoken</groupId>
            <artifactId>jjwt-api</artifactId>
            <version>${jjwt.version}</version>
        </dependency>
        <dependency>
            <groupId>io.jsonwebtoken</groupId>
            <artifactId>jjwt-impl</artifactId>
            <version>${jjwt.version}</version>
        </dependency>
        <dependency>
            <groupId>io.jsonwebtoken</groupId>
            <artifactId>jjwt-jackson</artifactId>
            <version>${jjwt.version}</version>
        </dependency>
    </dependencies>

    <build>
        <plugins>
            <plugin>
                <groupId>org.springframework.boot</groupId>
                <artifactId>spring-boot-maven-plugin</artifactId>
                <version>3.0.8</version> <!-- Specify the version explicitly -->
                <configuration>
                    <excludes>
                        <exclude>
                            <groupId>org.projectlombok</groupId>
                            <artifactId>lombok</artifactId>
                        </exclude>
                    </excludes>
                </configuration>
            </plugin>
        </plugins>
    </build>
</project>
Project Structure:
Before moving to the project here is the complete project structure.

Step 2: Create a Controller
Go to the src > main > java > controller and create a class UserController and put the below code. In this, we have created a simple REST API in our controller class.
UserController.java:
Java
package com.ey.springboot3security.controller;

import com.ey.springboot3security.entity.AuthRequest;
import com.ey.springboot3security.entity.UserInfo;
import com.ey.springboot3security.service.JwtService;
import com.ey.springboot3security.service.UserInfoService;

import org.springframework.beans.factory.annotation.Autowired;
import org.springframework.security.access.prepost.PreAuthorize;
import org.springframework.security.authentication.AuthenticationManager;
import org.springframework.security.authentication.UsernamePasswordAuthenticationToken;
import org.springframework.security.core.Authentication;
import org.springframework.security.core.userdetails.UsernameNotFoundException;

import org.springframework.web.bind.annotation.*;

@RestController
@RequestMapping("/auth")
@RequiredArgsConstructor
public class UserController {

    private UserInfoService service;

    private JwtService jwtService;

    private AuthenticationManager authenticationManager;

    @GetMapping("/welcome")
    public String welcome() {
        return "Welcome this endpoint is not secure";
    }

    @PostMapping("/addNewUser")
    public String addNewUser(@RequestBody UserInfo userInfo) {
        return service.addUser(userInfo);
    }

    // Removed the role checks here as they are already managed in SecurityConfig

    @PostMapping("/generateToken")
    public String authenticateAndGetToken(@RequestBody AuthRequest authRequest) {
        Authentication authentication = authenticationManager.authenticate(
            new UsernamePasswordAuthenticationToken(authRequest.getUsername(), authRequest.getPassword())
        );
        if (authentication.isAuthenticated()) {
            return jwtService.generateToken(authRequest.getUsername());
        } else {
            throw new UsernameNotFoundException("Invalid user request!");
        }
    }
}
Step 3: Create a SecurityConfig Class
Go to the src > main > java > config and create a class SecurityConfig and put the below code. This is the new changes brought in Spring Boot 3.0.
Java
package com.ey.springboot3security.config;

import com.ey.springboot3security.filter.JwtAuthFilter;
import com.ey.springboot3security.service.UserInfoDetails;

import org.springframework.context.annotation.Bean;
import org.springframework.context.annotation.Configuration;
import org.springframework.security.authentication.AuthenticationManager;
import org.springframework.security.authentication.AuthenticationProvider;
import org.springframework.security.authentication.dao.DaoAuthenticationProvider;
import org.springframework.security.config.annotation.authentication.builders.AuthenticationManagerBuilder;
import org.springframework.security.config.annotation.authentication.configuration.AuthenticationConfiguration;
import org.springframework.security.config.annotation.method.configuration.EnableMethodSecurity;
import org.springframework.security.config.annotation.web.builders.HttpSecurity;
import org.springframework.security.config.annotation.web.configuration.EnableWebSecurity;
import org.springframework.security.config.http.SessionCreationPolicy;
import org.springframework.security.core.userdetails.UserDetailsService;
import org.springframework.security.crypto.bcrypt.BCryptPasswordEncoder;
import org.springframework.security.crypto.password.PasswordEncoder;
import org.springframework.security.web.SecurityFilterChain;
import org.springframework.security.web.authentication.UsernamePasswordAuthenticationFilter;

@Configuration
@EnableWebSecurity
public class SecurityConfig {

    private final JwtAuthFilter jwtAuthFilter;
    private final UserDetailsService userDetailsService;

    // Constructor injection for required dependencies
    public SecurityConfig(JwtAuthFilter jwtAuthFilter,
                     UserDetailsService userDetailsService) {
    this.jwtAuthFilter = jwtAuthFilter;
    this.userDetailsService = userDetailsService;
}


    /*
     * Main security configuration
     * Defines endpoint access rules and JWT filter setup
     */
    @Bean
    public SecurityFilterChain securityFilterChain(HttpSecurity http) throws Exception {
        http
            // Disable CSRF (not needed for stateless JWT)
            .csrf(csrf -> csrf.disable())

            // Configure endpoint authorization
            .authorizeHttpRequests(auth -> auth
                // Public endpoints
                .requestMatchers("/auth/welcome", "/auth/addNewUser", "/auth/generateToken").permitAll()

                // Role-based endpoints
                .requestMatchers("/auth/user/**").hasAuthority("ROLE_USER")
                .requestMatchers("/auth/admin/**").hasAuthority("ROLE_ADMIN")

                // All other endpoints require authentication
                .anyRequest().authenticated()
            )

            // Stateless session (required for JWT)
            .sessionManagement(sess -> sess.sessionCreationPolicy(SessionCreationPolicy.STATELESS))

            // Set custom authentication provider
            .authenticationProvider(authenticationProvider())

            // Add JWT filter before Spring Security's default filter
            .addFilterBefore(jwtAuthFilter, UsernamePasswordAuthenticationFilter.class);

        return http.build();
    }

    /*
     * Password encoder bean (uses BCrypt hashing)
     * Critical for secure password storage
     */
    @Bean
    public PasswordEncoder passwordEncoder() {
        return new BCryptPasswordEncoder();
    }

    /*
     * Authentication provider configuration
     * Links UserDetailsService and PasswordEncoder
     */
    @Bean
    public AuthenticationProvider authenticationProvider() {
        DaoAuthenticationProvider provider = new DaoAuthenticationProvider();
        provider.setUserDetailsService(userDetailsService);
        provider.setPasswordEncoder(passwordEncoder());
        return provider;
    }

    /*
     * Authentication manager bean
     * Required for programmatic authentication (e.g., in /generateToken)
     */
    @Bean
    public AuthenticationManager authenticationManager(AuthenticationConfiguration config) throws Exception {
        return config.getAuthenticationManager();
    }
}
Step 4: Create Entity Classes
Go to the src > main > java > entity and create a class UserInfo and put the below code.
Java
package com.ey.springboot3security.entity;

import jakarta.persistence.Entity;
import jakarta.persistence.GeneratedValue;
import jakarta.persistence.GenerationType;
import jakarta.persistence.Id;
import lombok.AllArgsConstructor;
import lombok.Data;
import lombok.NoArgsConstructor;

@Entity
@Data
@AllArgsConstructor
@NoArgsConstructor
public class UserInfo {

    @Id
    @GeneratedValue(strategy = GenerationType.IDENTITY)
    private int id;
    private String name;
    private String email;
    private String password;
    private String roles;

}
Similarly, create a class AuthRequest and put the below code.
Java
package com.ey.springboot3security.entity;

import lombok.AllArgsConstructor;
import lombok.Data;
import lombok.NoArgsConstructor;

@Data
@AllArgsConstructor
@NoArgsConstructor
public class AuthRequest {

    private String username;
    private String password;

}
Step 5: Create Filter Class
Go to the src > main > java > filter and create a class JwtAuthFilter and put the below code.
Java
package com.ey.springboot3security.filter;

import com.ey.springboot3security.service.UserInfoDetails;
import com.ey.springboot3security.service.JwtService;

import jakarta.servlet.FilterChain;
import jakarta.servlet.ServletException;
import jakarta.servlet.http.HttpServletRequest;
import jakarta.servlet.http.HttpServletResponse;
import org.springframework.beans.factory.annotation.Autowired;
import org.springframework.security.authentication.UsernamePasswordAuthenticationToken;
import org.springframework.security.core.context.SecurityContextHolder;
import org.springframework.security.core.userdetails.UserDetails;
import org.springframework.security.web.authentication.WebAuthenticationDetailsSource;
import org.springframework.stereotype.Component;
import org.springframework.web.filter.OncePerRequestFilter;

import java.io.IOException;

@Component
public class JwtAuthFilter extends OncePerRequestFilter {

    private final UserDetailsService userDetailsService;
    private final JwtService jwtService;

    @Autowired
    public JwtAuthFilter(UserDetailsService userDetailsService, JwtService jwtService) {
        this.userDetailsService = userDetailsService;
        this.jwtService = jwtService;
    }

    @Override
    protected void doFilterInternal(HttpServletRequest request, HttpServletResponse response, FilterChain filterChain) throws ServletException, IOException {
        String authHeader = request.getHeader("Authorization");
        String token = null;
        String username = null;

        if (authHeader != null && authHeader.startsWith("Bearer ")) {
            token = authHeader.substring(7);
            username = jwtService.extractUsername(token);
        }

        if (username != null && SecurityContextHolder.getContext().getAuthentication() == null) {
            UserDetails userDetails = userDetailsService.loadUserByUsername(username);
            if (jwtService.validateToken(token, userDetails)) {
                UsernamePasswordAuthenticationToken authToken = new UsernamePasswordAuthenticationToken(
                        userDetails,
                        null,
                        userDetails.getAuthorities());
                authToken.setDetails(new WebAuthenticationDetailsSource().buildDetails(request));
                SecurityContextHolder.getContext().setAuthentication(authToken);
            }
        }
        filterChain.doFilter(request, response);
    }
}
Step 6: Create a Repository Interface
Go to the src > main > java > repository and create an interface UserInfoRepository and put the below code.
Java
package com.ey.springboot3security.repository;

import com.ey.springboot3security.entity.UserInfo;

import org.springframework.data.jpa.repository.JpaRepository;

import java.util.Optional;

@Repository
public interface UserInfoRepository extends JpaRepository<UserInfo, Integer> {
    Optional<UserInfo> findByEmail(String email); // Use 'email' if that is the correct field for login
}
Step 7: Create Service Classes
Go to the src > main > java > service and create a class JwtService and put the below code.
Java
package com.ey.springboot3security.service;

import io.jsonwebtoken.Claims;
import io.jsonwebtoken.Jwts;
import io.jsonwebtoken.SignatureAlgorithm;
import io.jsonwebtoken.io.Decoders;
import io.jsonwebtoken.security.Keys;
import org.springframework.security.core.userdetails.UserDetails;
import org.springframework.stereotype.Component;

import java.security.Key;
import java.util.Date;
import java.util.HashMap;
import java.util.Map;
import java.util.function.Function;

@Component
public class JwtService {

    public static final String SECRET = "5367566859703373367639792F423F452848284D6251655468576D5A71347437";

    public String generateToken(String email) { // Use email as username
        Map<String, Object> claims = new HashMap<>();
        return createToken(claims, email);
    }

    private String createToken(Map<String, Object> claims, String email) {
        return Jwts.builder()
                .setClaims(claims)
                .setSubject(email)
                .setIssuedAt(new Date())
                .setExpiration(new Date(System.currentTimeMillis() + 1000 * 60 * 30))
                .signWith(getSignKey(), SignatureAlgorithm.HS256)
                .compact();
    }

    private Key getSignKey() {
        byte[] keyBytes = Decoders.BASE64.decode(SECRET);
        return Keys.hmacShaKeyFor(keyBytes);
    }

    public String extractUsername(String token) {
        return extractClaim(token, Claims::getSubject);
    }

    public Date extractExpiration(String token) {
        return extractClaim(token, Claims::getExpiration);
    }

    public <T> T extractClaim(String token, Function<Claims, T> claimsResolver) {
        final Claims claims = extractAllClaims(token);
        return claimsResolver.apply(claims);
    }

    private Claims extractAllClaims(String token) {
        return Jwts.parserBuilder()
                .setSigningKey(getSignKey())
                .build()
                .parseClaimsJws(token)
                .getBody();
    }

    private Boolean isTokenExpired(String token) {
        return extractExpiration(token).before(new Date());
    }

    public Boolean validateToken(String token, UserDetails userDetails) {
        final String username = extractUsername(token);
        return (username.equals(userDetails.getUsername()) && !isTokenExpired(token));
    }
}
Similarly, create a class UserInfoDetails and put the below code.
Java
package com.ey.springboot3security.service;

import com.ey.springboot3security.entity.UserInfo;

import org.springframework.security.core.GrantedAuthority;
import org.springframework.security.core.authority.SimpleGrantedAuthority;
import org.springframework.security.core.userdetails.UserDetails;

import java.util.Collection;
import java.util.List;
import java.util.stream.Collectors;

public class UserInfoDetails implements UserDetails {

    private String username; // Changed from 'name' to 'email' for clarity
    private String password;
    private List<GrantedAuthority> authorities;

    public UserInfoDetails(UserInfo userInfo) {
        this.username = userInfo.getEmail(); // Use email as username
        this.password = userInfo.getPassword();
        this.authorities = List.of(userInfo.getRoles().split(","))
                .stream()
                .map(SimpleGrantedAuthority::new)
                .collect(Collectors.toList());
    }

    @Override
    public Collection<? extends GrantedAuthority> getAuthorities() {
        return authorities;
    }

    @Override
    public String getUsername() {
        return username;
    }

    @Override
    public boolean isAccountNonExpired() {
        return true;
    }

    @Override
    public boolean isAccountNonLocked() {
        return true;
    }

    @Override
    public boolean isCredentialsNonExpired() {
        return true;
    }

    @Override
    public boolean isEnabled() {
        return true;
    }
}
Similarly, create a class UserInfoService and put the below code.
Java
package com.ey.springboot3security.service;

import com.ey.springboot3security.entity.UserInfo;
import com.ey.springboot3security.repository.UserInfoRepository;
import org.springframework.beans.factory.annotation.Autowired;
import org.springframework.security.core.userdetails.User;
import org.springframework.security.core.userdetails.UserDetails;
import org.springframework.security.core.userdetails.UsernameNotFoundException;
import org.springframework.security.crypto.password.PasswordEncoder;
import org.springframework.stereotype.Service;

import java.util.Optional;

@Service
public class UserInfoService implements UserDetailsService {

    private final UserInfoRepository repository;
    private final PasswordEncoder encoder;

    @Autowired
    public UserInfoService(UserInfoRepository repository, PasswordEncoder encoder) {
        this.repository = repository;
        this.encoder = encoder;
    }

    // Method to load user details by username (email)
    @Override
    public UserDetails loadUserByUsername(String username) throws UsernameNotFoundException {
        // Fetch user from the database by email (username)
        Optional<UserInfo> userInfo = repository.findByEmail(username);

        if (userInfo.isEmpty()) {
            throw new UsernameNotFoundException("User not found with email: " + username);
        }

        // Convert UserInfo to UserDetails (UserInfoDetails)
        UserInfo user = userInfo.get();
        return new User(user.getEmail(), user.getPassword(), user.getRoles());
    }

    // Add any additional methods for registering or managing users
    public String addUser(UserInfo userInfo) {
        // Encrypt password before saving
        userInfo.setPassword(encoder.encode(userInfo.getPassword()));
        repository.save(userInfo);
        return "User added successfully!";
    }
}
Step 8: application.properties
Make the following changes in the application.properties file:
spring.datasource.driver-class-name=com.mysql.cj.jdbc.Driver
spring.datasource.url = jdbc:mysql://localhost:3306/university
spring.datasource.username = root
spring.datasource.password = 143@Arpilu
spring.jpa.hibernate.ddl-auto = update
spring.jpa.properties.hibernate.dialect = org.hibernate.dialect.MySQLDialect
spring.jpa.hibernate.naming.physical-strategy=org.hibernate.boot.model.naming.PhysicalNamingStrategyStandardImpl
Test the Application
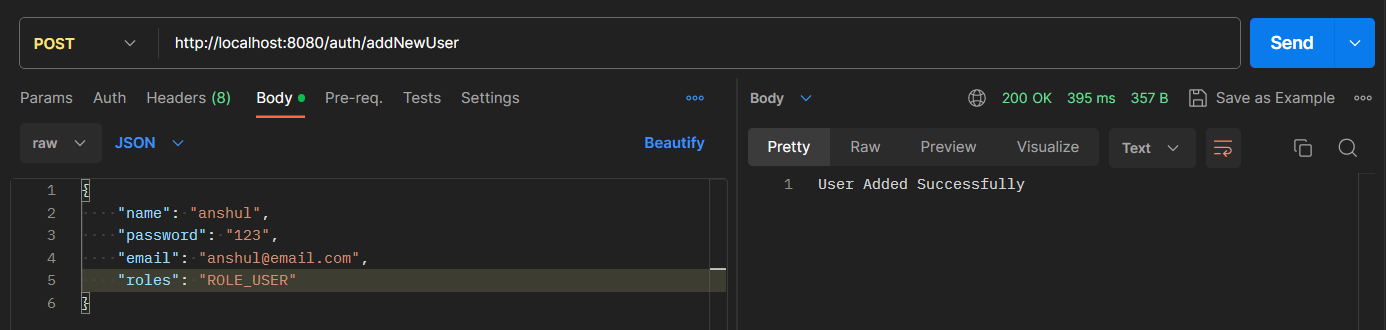
Now run your application and test it out. Hit the following URL:
http://localhost:8080/auth/addNewUser
It will add the user to the database.
Below is our database screenshot.

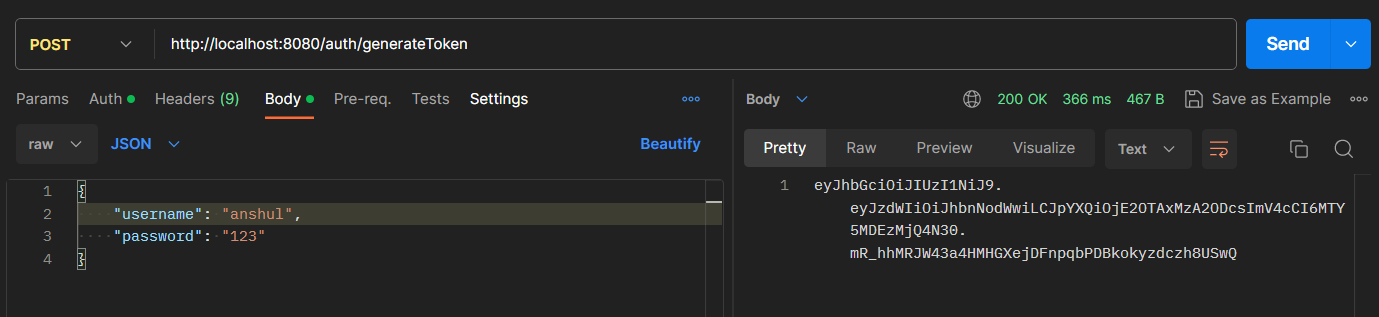
Now, hit the following URL to generate the token.
http://localhost:8080/auth/generateToken
It will generate the token.
Now using this take we can access our endpoint according to the ROLE. Hit the following URL and put the Bearer token.
http://localhost:8080/auth/user/userProfile
Refer to the screenshot below.

Similar Reads
Authentication and Authorization in Spring Boot 3.0 with Spring Security In Spring Security 5.7.0, the spring team deprecated the WebSecurityConfigurerAdapter, as they encourage users to move towards a component-based security configuration. Spring Boot 3.0 has come with many changes in Spring Security. So in this article, we will understand how to perform spring securit
3 min read
Spring Security - Custom Form Login with Database Authentication In this article, Spring Security Basic Authentication, we have demonstrated the Basic Authentication using In-Memory Authentication. But what if we are required to authenticate the user from the database? And also what if we are required to login with the custom form? In this article, we will explai
8 min read
Implementing Database Authentication and Authorization with Spring Security 6 Spring Security 6 has made setting up security in Spring applications easier and more straightforward by moving away from the older WebSecurityConfigurerAdapter method. This new approach helps you configure security in a clearer and more flexible way. In this article, we will learn how to set up use
9 min read
Migrating a Spring Boot Application from Spring Security 5 to Spring Security 6 Spring Security is a powerful authentication and access control framework for Java applications specially for those built with the Spring Framework. With the release of Spring Security 6, several enhancements and changes have been introduced to simplify the security configuration and provide better
4 min read
Securing Spring Boot 3 Applications With SSL Bundles In a web environment, securing an application is a crucial necessity. SSL, a Secure Socket Layer, provides a secure channel between the client and server by encrypting the transmitted data. In this article, we will go through the steps to secure a Spring Boot 3 application using SSL Bundles.What is
5 min read
Spring Security with LDAP Authentication LDAP (Lightweight Directory Access Protocol) is widely used for identity and access management. It organizes data in a hierarchical structure, optimized for read-heavy operations. LDAP is advantageous due to its scalability and interoperability. In this article, we will create a simple authenticatio
7 min read