Subir imagen usando JavaScript

Un usuario puede cargar una imagen a partir de un archivo HTML creando un campo de entrada del tipo de archivo en la sección del cuerpo. En este artículo, mostraremos ejemplos de cómo cargar una imagen usando JavaScript.

Cargar imagen de JavaScript
Se usará una etiqueta div con una identificación de display_image para mostrar la imagen que se cargará como salida con ancho y alto definidos.
Sintaxis:
 htmlCopy<input type ="file" id ="image_input" accept ="image/jpeg, image/png, image/jpg">
<div id="display_image"></div>
Para garantizar que la imagen cargada encaje perfectamente en el interior, las propiedades de la imagen deben agregarse a un archivo CSS con los valores adecuados. Aquí, el borde no es una propiedad esencial que deba agregarse, pero hará que el usuario vea fácilmente dónde aparece la imagen.
 cssCopy#display-image{
width: 500px;
height: 325px;
border: 2px solid black;
background-position: center;
background-size: cover;
}
A continuación, se debe crear un archivo JavaScript para obtener acceso al campo de entrada y adjuntar un detector de eventos "cambio", que es un evento que se ejecuta cuando el usuario ha cambiado el valor de un elemento. Bajo este detector, un usuario debe obtener acceso al objeto FileReader que permitirá que las aplicaciones web lean el contenido de los archivos o búferes de datos sin procesar almacenados en la máquina local del usuario y adjunte un detector de eventos "load" cuando toda la página está completamente cargada, incluidas todas las fuentes dependientes, como imágenes, archivos CSS y archivos JavaScript.
En pocas palabras, la imagen cargada se traduce a un formato visualizable. La imagen cargada se almacenará en la variable uploadImage, y esta variable se utilizará para inicializar la propiedad backgroundImage en CSS.
 javascriptCopyconst image_input = document.querySelector('#image_input');

image_input.addEventListener('change', function() {
  const file_reader = new FileReader();
  file_reader.addEventListener('load', () => {
    const uploaded_image = file_reader.result;
    document.querySelector('#display_image').style.backgroundImage =
        `url(${uploaded_image})`;
  });
  file_reader.readAsDataURL(this.files[0]);
});
Código fuente completo:
 htmlCopy<!DOCTYPE html>
<html>
<head>
<meta charset="utf-8">
<title>JavaScript Upload Image </title>
<style>
#display_image{
  width: 500px;
  height: 325px;
  border: 2px solid black;
  background-position: center;
  background-size: cover;
}
</style>
</head>

<body>

  <input type="file" id="image_input" accept="image/jpeg, image/png, image/jpg">
  <div id="display_image"></div>

<script>
const image_input = document.querySelector("#image_input");

image_input.addEventListener("change", function() {
  const file_reader = new FileReader();
  file_reader.addEventListener("load", () => {
    const uploaded_image = file_reader.result;
    document.querySelector("#display_image").style.backgroundImage = `url(${uploaded_image})`;
  });
  file_reader.readAsDataURL(this.files[0]);
});
</script>
</body>
</html>
Producción:
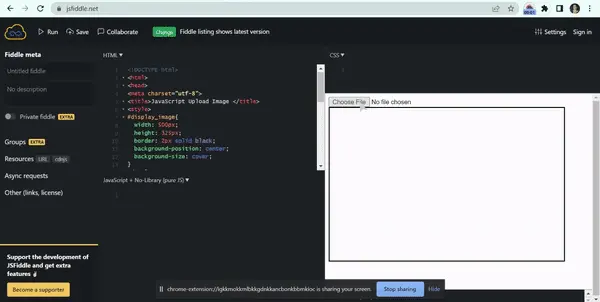
JavaScript Cargar imagen sin ancho o alto definido
También podemos subir una imagen sin ancho ni alto definido en su tamaño original en JavaScript. Siga los pasos a continuación.
-
Comience creando un archivo HTML y configure el archivo de tipo de entrada asignando la identificación como un archivo con la función de cambio
validación de archivo ()que llamará a la imagen cargada. -
A continuación, utilice el método de documento
.getElementById()dentro de la funciónfilevaildation()para seleccionar el elemento por sus ID a través devar image = document.getElementById(‘imagen cargada’);. -
Agregue un método estático
URL.createObjectURL()al programa para pasar la URL auploaded_image.srcque cargará la imagen cargada por el usuario en el navegador comouploaded_image.src=URL.createObjectURL(event.target.files[0]);. -
Para comprobar si el usuario ha seleccionado algún archivo, un bucle como
if(selected_file.files.length>0)y para obtener el tamaño del archivo seleccionadoconst file_size=selected_file.files.item(i).size;puede ser usado. -
A continuación, el tamaño del archivo se convertirá en bytes. Con el uso de
Math.round((file_size/1024));función se puede convertir a cualquier unidad.
Código fuente completo:
 htmlCopy<!DOCTYPE html>
<html>
<head>
    <meta charset="utf-8">
    <title>JavaScript Upload Image</title>
</head>
<body>
    <input type="file" id="file" onchange="FileValidation(event)" >
    <br><br><br>
    <h2>Uploaded Image by the User</h2>
    <img id="uploaded image">
</body>
<script>
    FileValidation = (event) => {
        var uploaded_image = document.getElementById('uploaded image');
    uploaded_image.src = URL.createObjectURL(event.target.files[0]);
        const selected_file = document.getElementById("file");
        if (selected_file.files.length > 0) {
            for (const i = 0; i <= selected_file.files.length - 1; i++) {
                const file_size = selected_file.files.item(i).size;

                const file = Math.round((file_size / 1024));
                }
                }
                }
</script>
</html>
Producción:
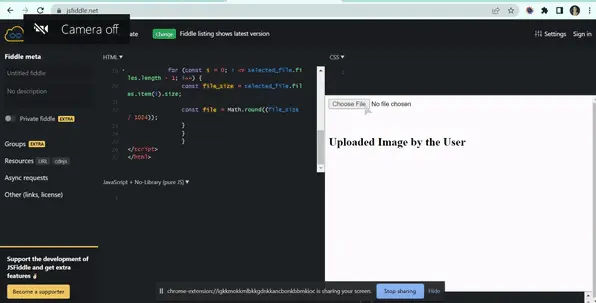
A partir del código anterior, el usuario puede seleccionar y cargar cualquier tipo de archivo, pero no se puede mostrar. Con implementaciones adicionales, se pueden realizar múltiples cargas de imágenes agregando más codificación a los programas anteriores según el requisito.

Nimesha is a Full-stack Software Engineer for more than five years, he loves technology, as technology has the power to solve our many problems within just a minute. He have been contributing to various projects over the last 5+ years and working with almost all the so-called 03 tiers(DB, M-Tier, and Client). Recently, he has started working with DevOps technologies such as Azure administration, Kubernetes, Terraform automation, and Bash scripting as well.