Spring Authorization Server Example with OAuth 2 Client Credentials and In-memory Users
- Details
- Written by Nam Ha Minh
- Last Updated on 04 April 2025 | Print Email
- default security settings imposed by Spring Security: all requests must be authenticated and clients can get access token via the /oauth2/token endpoint.
- client credentials stored in memory: for the shake of simplicity and simple usages.
- OAuth2 Client Credentials grant type: is the workflow used by REST clients to obtain access tokens from the authorization server
- an in-memory RSA key pair which will be generated by Spring Security upon application start
- write tests with Spring Security Test
- test Get Access Token API using curl and Postman
- Spring Boot 3.4.2
- Spring framework 6.2.2
- Spring Security 6.4.2
- Spring Security OAuth2 Authorization Server 1.4.1
Table of Content:
1. Create New Spring Starter Project2. Enable Spring Authorization Server
3. Create In-memory Client Credentials
4. Understand Get Access Token API
5. Write Code to Test Get Access Token API
6. Decode Issued Access Token
7. Test Get Access Token using curl
8. Test Get Access Token using Postman Next, let’s start coding a new Spring Boot project for an authorization server which will be used by REST clients to get access tokens.
1. Create New Spring Starter Project
In Spring Tool Suite, create a new Spring Starter project with the following details:- Name: SpringAuthorizationServerExample
- Type: Maven
- Java version: 17
- Packaging: jar
- Language: Java
- Group: net.codejava.rest
- Artifact: SpringAuthorizationServerExample
- Version: 0.0.1-SNAPSHOT
- Package: net.codejava.rest
- Spring Boot version: 3.4.2
- Spring Web
- Spring Security
- OAuth2 Authorization Server
- Spring Boot DevTools (optional)
<project ...>
	<parent>
		<groupId>org.springframework.boot</groupId>
		<artifactId>spring-boot-starter-parent</artifactId>
		<version>3.4.2</version>
		<relativePath/> <!-- lookup parent from repository -->
	</parent>

	<properties>
		<java.version>17</java.version>
	</properties>

	<dependencies>
		<dependency>
			<groupId>org.springframework.boot</groupId>
			<artifactId>spring-boot-starter-oauth2-authorization-server</artifactId>
		</dependency>
		<dependency>
			<groupId>org.springframework.boot</groupId>
			<artifactId>spring-boot-starter-web</artifactId>
		</dependency>

		<dependency>
			<groupId>org.springframework.boot</groupId>
			<artifactId>spring-boot-devtools</artifactId>
			<scope>runtime</scope>
			<optional>true</optional>
		</dependency>
		<dependency>
			<groupId>org.springframework.boot</groupId>
			<artifactId>spring-boot-starter-test</artifactId>
			<scope>test</scope>
		</dependency>
	</dependencies>

</project>
Note that the spring-boot-starter-test dependency is automatically added by default.
2. Enable Spring Authorization Server
Before writing code to enable Spring authorization server, let’s understand the responsibility of an authorization server in the context of REST API security.Roles of authorization server:
The authorization server will authenticate the clients via the /oauth2/token endpoint. The clients must send the credentials in form of Client ID and Client Secret if the grant type is Client Credentials. If the credentials are valid, then the server will issue a new access token that follows JWT format (JSON Web Token).To enable Spring authorization server for the application, create a new class named AuthorizationServerConfig with the following initial code:package net.codejava;
import org.springframework.context.annotation.Bean;
import org.springframework.context.annotation.Configuration;
import org.springframework.security.config.Customizer;
import org.springframework.security.config.annotation.web.builders.HttpSecurity;
import org.springframework.security.oauth2.server.authorization.config.annotation.web.configurers.OAuth2AuthorizationServerConfigurer;
import org.springframework.security.web.SecurityFilterChain;
@Configuration
public class AuthorizationServerConfig {
@Bean
SecurityFilterChain authorizationServerFilterChain(HttpSecurity http) throws Exception {
http.with(OAuth2AuthorizationServerConfigurer.authorizationServer(), Customizer.withDefaults());
return http.build();
}
}This Spring configuration class declares a bean of type SecurityFilterChain that activates the authorization server with default security configurations. At this time, the /oauth2/token endpoint is ready to server clients but we need to create some client credentials before testing it. You can also customize the JWTs generated by Spring authorization server, by following this guide. 3. Create In-memory Client Credentials
To tell the server where to get client information, declare a bean of type RegisteredClientRepository in the AuthorizationServerConfig class. For example:@Bean
RegisteredClientRepository registeredClientRepository() {
RegisteredClient client1 = RegisteredClient.withId(UUID.randomUUID().toString())
.clientId("client-1")
.clientName("John Doe")
.clientSecret("{noop}password1")
.scope("read")
.authorizationGrantType(AuthorizationGrantType.CLIENT_CREDENTIALS)
.clientAuthenticationMethod(ClientAuthenticationMethod.CLIENT_SECRET_POST)
.build();
return new InMemoryRegisteredClientRepository(client1);
}Here, we create a RegisteredClient object that represents a client registration with the following details:- Id: is a random, unique identifier of the client registration
- client Id: is the client identifier. REST clients must provide client Id to get access token.
- client Name: is the name of the client
- client Secret: is something like password of the client. We use the prefix {nooop} so we don’t have to encode the password (for testing/demo purpose only). REST clients must provide client Secret to get access token.
- scope: is the authority or permission of the client.
- authorization grant type: for REST API security, we specify CLIENT_CREDENTIALS as the authorization grant type of this client.
- client authentication method: we set the CLIENT_SECRET_POST as the client authentication method of this client. It means that the REST clients will provide client ID and client secret in the body of the request.
RegisteredClient client1 = ...
RegisteredClient client2 = ...
RegisteredClient client3 = ...

return new InMemoryRegisteredClientRepository(client1, client2, client3);
That’s the code required to enable Spring authorization server with default security settings and in-memory client credentials.

Spring Boot REST APIs Ultimate Course
Hands-on REST API Development with Spring Boot: Design, Implement, Document, Secure, Test, Consume RESTful APIs
4. Understand Get Access Token API
As per the OAuth2 specification, the authorization server should provide the Get Access Token API with:- Endpoint: /oauth2/token
- Request method: POST
- Required parameters: grant_type, client_id and client_secret.
{
  "error": "invalid_client"
}
Else if the client credentials are valid, the server will return HTTP status 200 (Successful) with the following response body:{
"access_token": "Encoded Access Token",
"token_type": "Bearer",
"expires_in": 299
}This JSON document has three fields:- access_token: contains the issued access token in JWT format. REST clients will use this token to access protected APIs on the resource server.
- token_type: always has the value Bearer
- expires_in: is the number of seconds after which the token expires. By default, a token has expiry time is about 5 minutes (299 seconds).
5. Write Code to Test Get Access Token API
Next, let’s write a couple of “unit tests” to verify the authorization server working or not. Firstly, we test the failure case in which incorrect client Id and client Secret are provided. In the test source package, create a new class named SecurityTests with the following code for the first test method:package net.codejava;
import static org.hamcrest.CoreMatchers.is;
import static org.springframework.test.web.servlet.request.MockMvcRequestBuilders.post;
import static org.springframework.test.web.servlet.result.MockMvcResultHandlers.print;
import static org.springframework.test.web.servlet.result.MockMvcResultMatchers.jsonPath;
import static org.springframework.test.web.servlet.result.MockMvcResultMatchers.status;
import org.junit.jupiter.api.Test;
import org.springframework.beans.factory.annotation.Autowired;
import org.springframework.boot.test.autoconfigure.web.servlet.AutoConfigureMockMvc;
import org.springframework.boot.test.context.SpringBootTest;
import org.springframework.test.web.servlet.MockMvc;
@SpringBootTest
@AutoConfigureMockMvc
public class SecurityTests {
private static final String GET_ACCESS_TOKEN_ENDPOINT = "/oauth2/token";
@Autowired MockMvc mockMvc;
@Test
public void testGetAccessTokenFail() throws Exception {
mockMvc.perform(post(GET_ACCESS_TOKEN_ENDPOINT)
.param("client_id", "client-1")
.param("client_secret", "test")
.param("grant_type", "client_credentials")
)
.andExpect(status().isUnauthorized())
.andExpect(jsonPath("$.error", is("invalid_client")))
.andDo(print());
}
}You can see that this test class is annotated with the @SpringBootTest annotation, which means the tests will load the whole Spring application when running. So it’s more likely integration test rather than unit test.In this test method, we send correct client Id (client-1) but invalid secret (test), and we expect the server return status 401 Unauthorized with a JSON in the response body having the error field containing the value invalid_client (as per description of the Get Access Token API mentioned above).Secondly, we code the second test method for the successful case, as follows:@Test
public void testGetAccessTokenSuccess() throws Exception {
mockMvc.perform(post(GET_ACCESS_TOKEN_ENDPOINT)
.param("client_id", "client-1")
.param("client_secret", "password1")
.param("grant_type", "client_credentials")
)
.andExpect(status().isOk())
.andExpect(jsonPath("$.access_token").isString())
.andExpect(jsonPath("$.expires_in").isNumber())
.andExpect(jsonPath("$.token_type", is("Bearer")))
.andDo(print());
}In this test, we send correct client Id and secret and expect the response as described in the Get Access Token API description.Run both the methods as JUnit test and you should see they pass the test. 6. Decode Issued Access Token
When you run the testGetAccessTokenSuccess() method, the server should return the following response body:{
"access_token": "eyJraWQiOiJjNT...YCz1r70F0a9B8bb_D_kHyVzjzm8nmzi5ng_Rs13HHZE4xk3SMiitrA",
"token_type": "Bearer",
"expires_in": 299
}The Spring authorization server issues a new access token contained in the access_token field. The access token is encoded using Base64 URL encoding so you can use and Base64 decoder to view its content.Here I use this online JWT decoder to decode the access token. Copy the value of the access_token field into the Encoded textbox and you will get it decoded instantly, as shown below: The encoded access token is decoded as shown on the right side. You can see the information in the header (key identifier and algorithm name) and payload (subject, audience, issuer, expiration, etc.).It’s recommended to decode the issued access tokens to verify that they contain the desired information and do not expose security risks.
 7. Test Get Access Token using curl
Now, it’s time to start the Spring application SpringAuthorizationServerExample to test out the Get Access Token API exposed by the authorization server. In command prompt or terminal, you can use the following curl command to test:curl -d "grant_type=client_credentials&client_id=client-1&client_secret=password1" localhost:8080/oauth2/token -vThe following screenshot shows an example request and response:
 Check this guide to learn more about testing REST APIs using curl command line tool. To prettify the JSON in the response, follow this tip.
 8. Test Get Access Token using Postman
You can also use a visual tool like Postman to test the authorization server for more convenience. In Postman, create a new request with the following details:- Method: POST
- URL: localhost:8080/oauth2/token
- Body: x-www-form-urlencoded with three parameters: client_id, client_secret and grant_type.
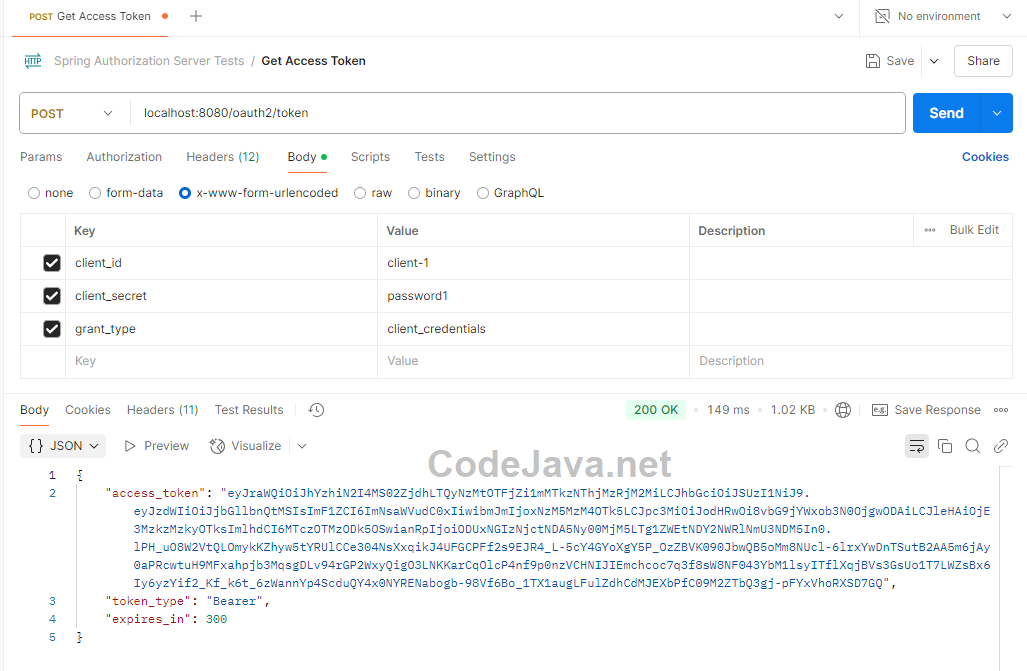 This means the authorization server accepts the request, verifies the client ID and secret, and issue a new access token in the response body. Check this guide to learn more about testing REST APIs using Postman.
 Conclusion
The Spring Security OAuth2 Authorization Server library makes it easy to implement a standard, functional authorization server that follows the OAuth2 specification, as I have demonstrated in this tutorial. Based on the code examples illustrated above, I hope you will be able to apply in your own REST API applications that are built using Java, Spring framework, Spring Boot and Spring Security.For reference, you can download the sample project attached below. To watch the coding in action, I recommend you watch the following video:Related Articles:
- How to Customize Access Token Generation in Spring Authorization Server
- How to Decode JWTs and Verify Signature
- Testing REST APIs using curl
- Testing REST APIs using Postman
- JSON Web Token (JWT) for Beginners
Other REST API Tutorials:
- Java RESTful Web Services Tutorial for Beginner with Jersey and Tomcat
- Java CRUD RESTful Web Services Examples with Jersey and Tomcat
- Spring Boot Hello World RESTful Web Services Tutorial
- Spring Boot RESTful CRUD API Examples with MySQL database
- Spring Boot File Download and Upload REST API Examples
- Spring Boot REST API CRUD with HATEOAS Tutorial
- How to Use curl for Testing REST APIs (Test CRUD Operations)
- How to Use Postman for Testing REST APIs (Test CRUD Operations)
About the Author:
 Nam Ha Minh is certified Java programmer (SCJP and SCWCD). He began programming with Java back in the days of Java 1.4 and has been passionate about it ever since. You can connect with him on Facebook and watch his Java videos on YouTube.
| [Sample Spring Authorization Server Project] | 26 kB |