In this article, we will learn about android ImageFilterButton using Kotlin. We will go through various example that demonstrates how to use different attributes of ImageFilterButton. For example,
In this article, we will get answer to questions like –
- What is ImageFilterButton?
- Why should we consider ImageFilterButton while designing ui for any app?
- What are possibilities using ImageFilterButton while designing ui? etc.
Let’s have a quick demo of things we want to cover in this tutorial –
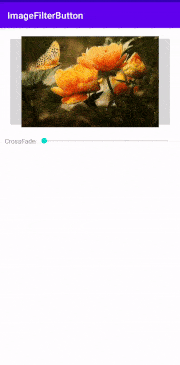
Output
Getting Started
We can define android ImageFilterButton widget as below –
ImageFilterButton is subclass of AppCompatImageButton that can display, combine and filter images.
In our application, we are going to combine two images and show it one above other. In other words, we are going to learn how can we show any image as background or foreground for other image.
Now, how do we use ImageFilterButton in android application ?
Creating New Project
At first, we will create an application.
So, follow steps below to create any android project in Kotlin –
| Step | Description |
|---|---|
| 1. | Open Android Studio (Ignore if already done). |
| 2. | Go to File => New => New Project. This will open a new window. Then, under Phone and Tablet section, select Empty Activity. Then, click Next. |
| 3. | In next screen, select project name as ImageFilterButton. Then, fill other required details. |
| 4. | Then, clicking on Finish button creates new project. |
Newbie in Android ?
Some very important concepts (Recommended to learn before you move ahead)
Before we move ahead, we need to setup for viewBinding to access Android ImageFilterButton Using Kotlin file without using findViewById() method.
Setup ViewBinding
Add viewBinding true in app/build.gradle file.
 android {
 	// OTHER CODE...
 	buildFeatures {
 		viewBinding true
 	}
 }
Now, set content in activity using view binding.
Open MainActivity.kt file and write below code in it.
 class MainActivity : AppCompatActivity() {

 	private lateinit var binding: ActivityMainBinding

 	override fun onCreate(savedInstanceState: Bundle?) {
 		super.onCreate(savedInstanceState)
 		binding = ActivityMainBinding.inflate(layoutInflater)
 		val view = binding.root
 		setContentView(view)
 	}
 }
Now, we can access view in Kotlin file without using findViewById() method.
Using ImageFilterButton in Kotlin
Follow steps below to use ImageFilterButton in newly created project –
- Open res/values/strings.xml file. Then, add below code into it.
<resources> <string name="app_name">ImageFilterButton</string> <string name="saturation">Saturation</string> <string name="crossFade">CrossFade</string> </resources> - Open res/layout/activity_main.xml file. Then, add below code in it –
<?xml version="1.0" encoding="utf-8"?>
<androidx.constraintlayout.widget.ConstraintLayout xmlns:android="http://schemas.android.com/apk/res/android"
    xmlns:app="http://schemas.android.com/apk/res-auto"
    xmlns:tools="http://schemas.android.com/tools"
    android:layout_width="match_parent"
    android:layout_height="match_parent"
    android:padding="10dp"
    tools:context=".MainActivity">

    <androidx.constraintlayout.utils.widget.ImageFilterButton
        android:id="@+id/imageFilterButton"
        android:layout_width="0dp"
        android:layout_height="wrap_content"
        android:layout_marginStart="8dp"
        android:layout_marginTop="8dp"
        android:layout_marginEnd="8dp"
        android:src="@drawable/garden"
        app:altSrc="@drawable/ic_launcher_foreground"
        app:crossfade="0"
        app:layout_constraintEnd_toEndOf="parent"
        app:layout_constraintStart_toStartOf="parent"
        app:layout_constraintTop_toTopOf="parent"
        tools:srcCompat="@tools:sample/avatars" />

    <TextView
        android:id="@+id/crossFade_key"
        android:layout_width="70dp"
        android:layout_height="wrap_content"
        android:layout_marginTop="20dp"
        android:text="@string/crossFade"
        app:layout_constraintStart_toStartOf="parent"
        app:layout_constraintTop_toBottomOf="@+id/imageFilterButton" />

    <SeekBar
        android:id="@+id/crossFadeSeekBar"
        android:layout_width="0dp"
        android:layout_height="wrap_content"
        android:layout_marginTop="20dp"
        app:layout_constraintEnd_toEndOf="parent"
        app:layout_constraintStart_toEndOf="@+id/crossFade_key"
        app:layout_constraintTop_toBottomOf="@+id/imageFilterButton" />

</androidx.constraintlayout.widget.ConstraintLayout>
Here, we have used Android SeekBar to change value of crossFade for imageFilterView. By increasing value, we will change visibility status of image set using app:altSrc=”” attribute.
-
We can also access it in Kotlin File, MainActivity.kt, as below –
package com.tutorialwing.imagefilterbutton

import androidx.appcompat.app.AppCompatActivity
import android.os.Bundle
import android.widget.SeekBar
import com.tutorialwing.imagefilterbutton.databinding.ActivityMainBinding

class MainActivity : AppCompatActivity() {

	private lateinit var binding: ActivityMainBinding

	override fun onCreate(savedInstanceState: Bundle?) {
		super.onCreate(savedInstanceState)

		binding = ActivityMainBinding.inflate(layoutInflater)
		setContentView(binding.root)

		setupCrossFadeSeekbar()
	}

	private fun setupCrossFadeSeekbar() {
		binding.crossFadeSeekBar.setOnSeekBarChangeListener(object :
			SeekBar.OnSeekBarChangeListener {
			override fun onProgressChanged(seekbar: SeekBar?, progress: Int, p2: Boolean) {
				val percentage = (progress / 100.0f)
				binding.imageFilterButton.crossfade = (percentage)
			}

			override fun onStartTrackingTouch(seekbar: SeekBar?) {
			}

			override fun onStopTrackingTouch(seekbar: SeekBar?) {
			}
		})
	}
}
Inside setupCrossFadeSeekbar() method, we have set seekBar change listener to SeekBar having id crossFadeSeekBar . Whenever any value is changed, crossfade value of ImageFilterButton changes.
Now, run the application. We will get output as below –
Different Attributes of ImageFilterButton in XML
Now, we will see how to use different attributes of Android ImageFilterButton using Kotlin to customise it –
Set Id of ImageFilterButton
Many a time, we need id of View to access it in kotlin file or create ui relative to that view in xml file. So, we can set id of ImageFilterButton using android:id attribute like below –
    <androidx.constraintlayout.utils.widget.ImageFilterButton
        android:id="@+id/imageFilterButton_ID"
        />
Here, we have set id of ImageFilterButton as imageFilterButton_ID using android:id=”” attribute. So, if we need to reference this ImageFilterButton, we need to use this id – imageFilterButton_ID.
Set Width of ImageFilterButton
We use android:layout_width=”” attribute to set width of ImageFilterButton.
We can do it as below –
    <androidx.constraintlayout.utils.widget.ImageFilterButton
        android:id="@+id/imageFilterButton_ID"
        android:layout_width="wrap_content"
        />
Width can be either “MATCH_PARENT” or “WRAP_CONTENT” or any fixed value (like 20dp, 30dp etc.).
Set Height of ImageFilterButton
We use android:layout_height=”” attribute to set height of ImageFilterButton.
We can do it as below –
    <androidx.constraintlayout.utils.widget.ImageFilterButton
        android:id="@+id/imageFilterButton_ID"
        android:layout_width="wrap_content"
        android:layout_height="wrap_content"
        />
Height can be either “MATCH_PARENT” or “WRAP_CONTENT” or any fixed value.
Set Padding of ImageFilterButton
We use android:padding=”” attribute to set padding of ImageFilterButton.
We can do it as below –
    <androidx.constraintlayout.utils.widget.ImageFilterButton
        android:id="@+id/imageFilterButton_ID"
        android:layout_width="wrap_content"
        android:layout_height="wrap_content"
        android:padding="10dp"
        />
Here, we have set padding of 10dp in ImageFilterButton using android:padding=”” attribute.
Set Margin of ImageFilterButton
We use android:layout_margin=”” attribute to set margin of ImageFilterButton.
We can do it as below –
    <androidx.constraintlayout.utils.widget.ImageFilterButton
        android:id="@+id/imageFilterButton_ID"
        android:layout_width="wrap_content"
        android:layout_height="wrap_content"
        android:layout_margin="10dp"
        />
Here, we have set margin of 10dp in ImageFilterButton using android:layout_margin=”” attribute.
Set Background of ImageFilterButton
We use android:background=”” attribute to set background of ImageFilterButton.
We can do it as below –
    <androidx.constraintlayout.utils.widget.ImageFilterButton
        android:id="@+id/imageFilterButton_ID"
        android:layout_width="wrap_content"
        android:layout_height="wrap_content"
        android:background="#ff0000"
        />
Here, we have set background of color #ff0000 in ImageFilterButton using android:background=”” attribute.
Set Visibility of ImageFilterButton
We use android:visibility=”” attribute to set visibility of ImageFilterButton.
We can do it as below –
    <androidx.constraintlayout.utils.widget.ImageFilterButton
        android:id="@+id/imageFilterButton_ID"
        android:layout_width="wrap_content"
        android:layout_height="wrap_content"
        android:visibility="gone"
        />
Here, we have set visibility of ImageFilterButton using android:visibility=”” attribute. Visibility can be of three types – gone, visible and invisible
Thus, we have seen what is ImageFilterButton, how can we use android ImageFilterButton using Kotlin ? etc. We also went through different attributes of android ImageFilterButton.
You must be logged in to post a comment.