
If you are using Windows 10 or 11, you might have noticed blurry screens at times. Most users face it while opening pages or documents.
The text on the screen goes blurry and keeps flickering as you scroll down. The reason can be the latest Windows update or an outdated graphics card driver.

However, some users also face the issue while attaching a second monitor. As the pages or images don’t automatically adjust to the native display resolution, you see a pixelated screen.
No matter why you’re facing this issue, you can try a handful of workarounds to fix blurry screens on Windows 10/11.
First, try adjusting your DPI settings and scaling to see if that helps. In case of blurry text, consider enabling ClearType to improve text clarity.
Alternatively, you can activate the “High Performance” graphics mode within affected apps to fix the issue. Finally, updating your drivers may also prove helpful in resolving any visual problems you’re experiencing.
We have jotted down the step-by-step process for each solution mentioned above. Try them out until you get a clear screen on your Windows PC.
Restart Your PC
Before you try any troubleshooting method, restart your PC. For many users, simply restarting the Windows PC has worked. Restarting your computer will work if you’re facing this issue because of a program running in the background or too much content on RAM. To restart your computer, follow the below steps.
1. Press the Windows logo key along with the X button.
2. Then, expand the Shut down or sign out option.
3. An extended menu will pop up now; click Restart.

Alternatively, you can also restart your PC by using a shortcut method. Go through the steps below to do so.
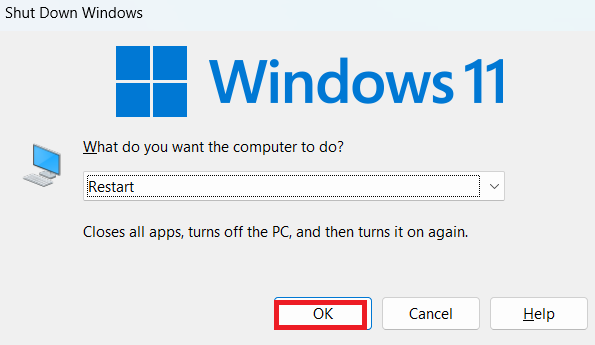
1. Press the ALT + F4 keys to prompt the Shut Down Windows.
2. Hit the down arrow right to Switch user.

3. Select Restart from the drop-down menu.

4. Tap OK to Restart your PC.
Adjust Display Resolution
If you use a second monitor, ensure the display resolution and scaling are correctly set to fit the native resolution. Otherwise, the images will get pixelated, and texts will feel too small on the screen. The recommended resolution and scaling are already set on Windows 10 and 11. You need to change it manually to get the compatible settings. Follow the below steps to do so.
1. Press the Windows logo key along with the I button to open Settings.
2. Next, click Display from the right-side tab.
3. Under Scale & layout, expand the Display resolution drop-down.

4. Now, choose the resolution fittest to your monitor or laptop screen.
5. Next, click the drop-down next to Scale.
6. Select the correct scaling percentage to change the text size, apps, and other items.

7. Finally, the screen should appear clear.
Enable ClearType Text
ClearType Text is a system tool that offers a clearer and more sharp view of the text on the screen. So, you can read those easily without any pixelated view. This solution is ideal for users getting blurry text on Windows 10/11. Follow the below steps to enable ClearType.
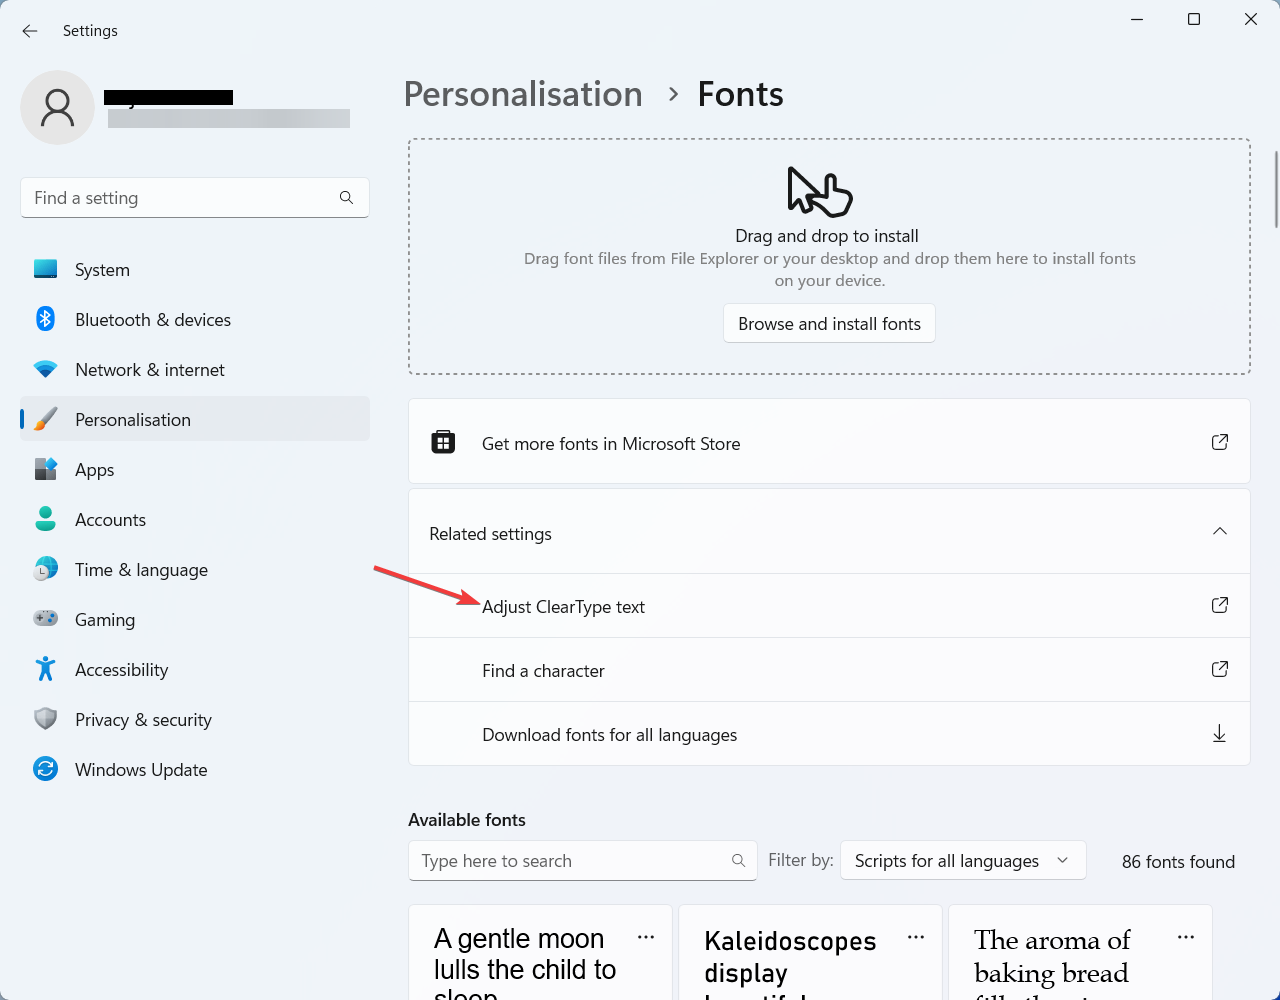
1. Press the Windows logo key + I to open Settings.
2. Next, select Personalization from the left pane.
3. On the right tab, scroll down and click Fonts.

4. Now, expand the Related Settings section from the Fonts window.
5. Click Adjust ClearType text.
6. The ClearType Text Tuner window will open now.

7. Click Next, and keep following the on-screen instructions.
8. Once you enable ClearType text, blurry texts shouldn’t appear further.
Change the APP DIP Settings
When a particular app UI appears blurry on the screen, try this solution. Changing the DPI settings of the problematic app will help it fit into the native resolution of the screen. Hence the app widgets or windows won’t appear blurry anymore. We have mentioned the detailed process of it below.
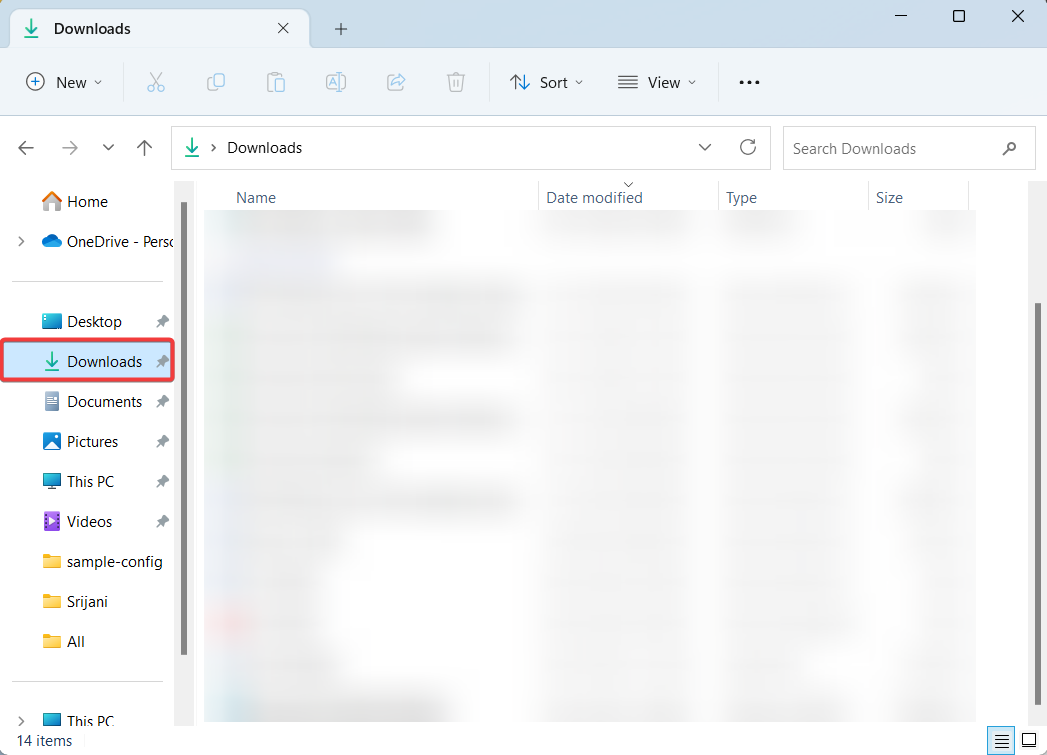
1. First, open File Explorer by pressing the Windows logo key + E button.
2. Next, click Downloads from the left pane.
3. Alternatively, you can access the path where you have saved the setup file of the application that you want to change DPI for.
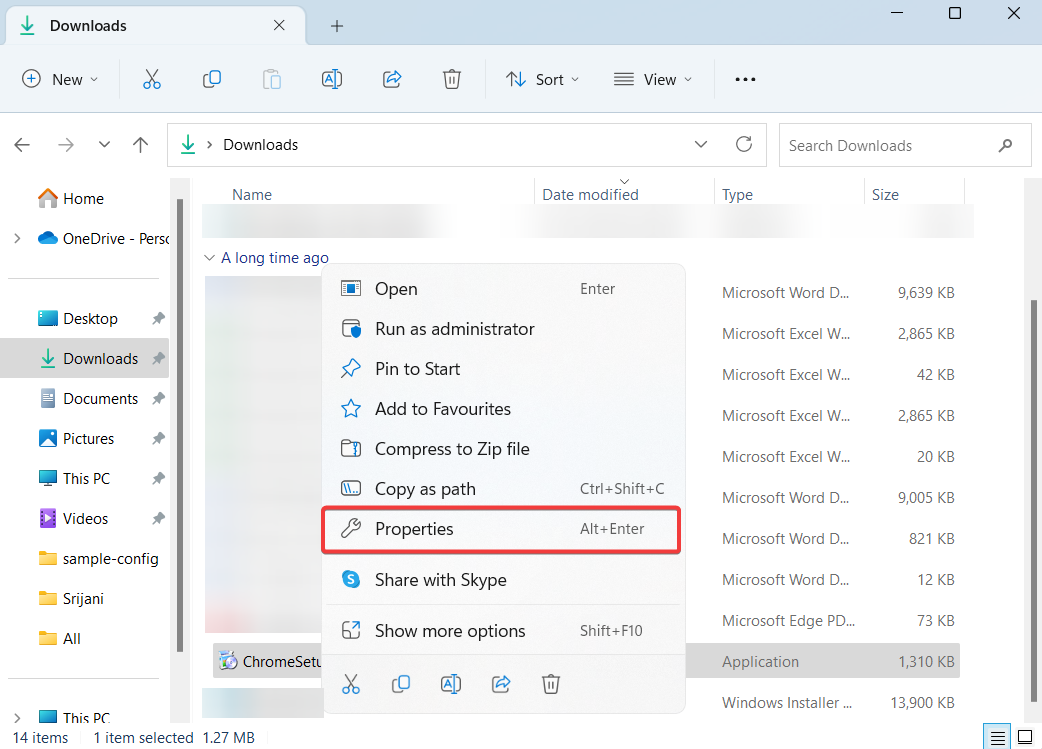
4. Now, right-click on the executable (.exe) file and choose Properties from the context menu.
5. On the Properties window, navigate to the Compatibility tab.
6. Next, scroll down and click the Change high DPI settings button under the Settings section.

7. The High DPI Settings window will open now; check the boxes below options.
- Use these settings to fix scaling problems for this program instead of the ones in Settings.
- Override high DPI scaling behavior.

8. Once done, click OK to close the tab.
Enable Best Appearance Settings
You might know Windows offers three settings for visual effects. You can set it to perform best, appear best, or let it automatically pick the effect. But if you’re getting a blurry screen, you have to drop the first two options. Otherwise, the screen appearance won’t be prioritized by your system. Check how to enable the best appearance settings on Windows 10 and 11 below.
1. Press the Windows logo key + R to open the Run dialogue box.
2. Next, type in sysdm.cpl and click Enter to open System Properties.

3. In the System Properties window, navigate to the Advanced tab.
4. Under the Performance section, click Settings.

5. A pop-up window will open next.
6. Choose the Adjust for best appearance option from the Visual Effects tab.

7. Now, click OK to apply the changes.
8. Your screen should appear fine now.
Change Graphics to High Performance
This solution is for specific apps with pixelated UI issues. Changing the graphic performance for the app showing a blurry screen will help you resolve it. Here is the detailed method to set the graphic preference to high performance for individual apps.
1. Press the Windows logo key + I button to open Settings.
2. Next, click System from the left pane and choose Display on the right tab.
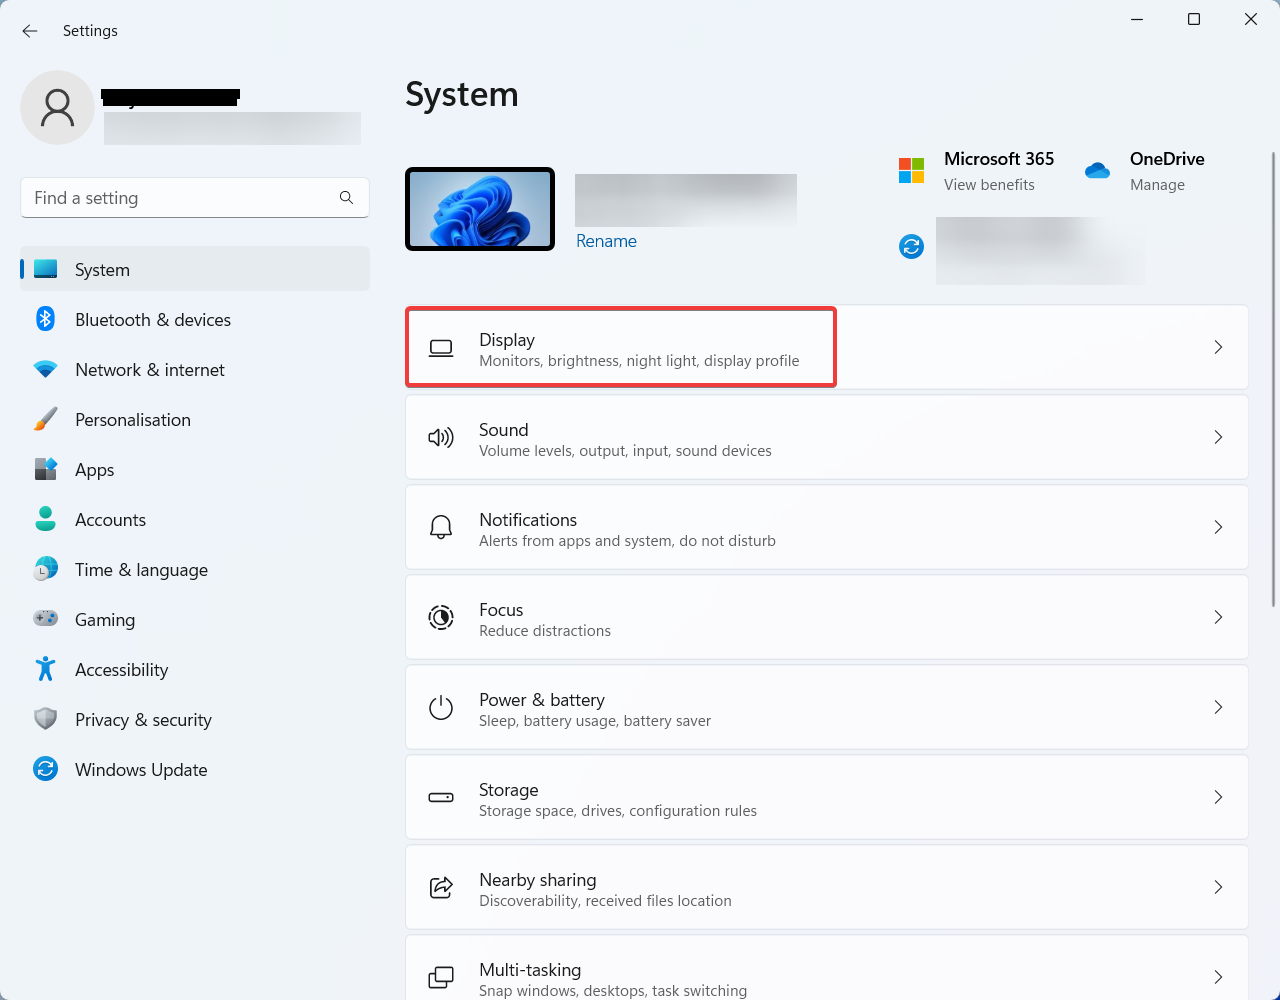
3. On the Display window, click Graphics under Related settings.
4. Now, on the Graphics window, click on the app you want to change your graphics preference for.

5. Click the Options button, and the Graphics Preference window will open.

6. Now, choose High performance from the list of options and click Save.

7. Once you save the preference, the related app will work fine.
Run Windows Memory Diagnostic
If your PC is facing any RAM problem or storage issue, it might fail to launch an app properly and load the screen. Running the Windows memory diagnostic will help you fix the existing issue and clear RAM for better app performance. Take a look at the steps to run this diagnostic tool.
1. Press the Windows logo key + S to open Search.
2. Next, type in Windows Memory Diagnostic and open the program.
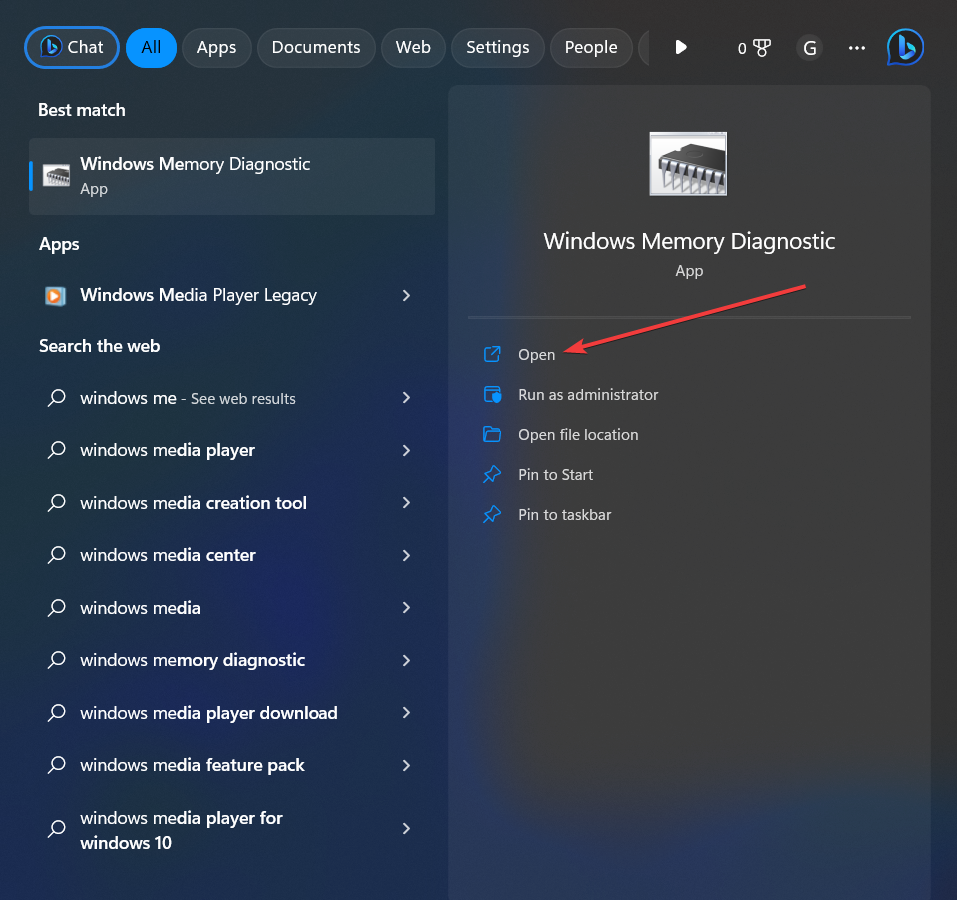
3. You will get two options now.
- Restart now and check for problems.
- Check for problems the next time I start my computer.

4. Choose your preferred option.
5. Once you get the diagnostic data, take the suggested action to fix blurry screens.
Update Graphics Card Driver
Updating your graphics card driver will help you fix any compatibility errors. When you use an outdated or corrupted display driver, the apps don’t get enough resources to fit screen resolution or work properly. That’s why updating the graphics card driver in use will fix the problem.
1. Press the Windows logo key + S to open Search.
2. Enter Device Manager in the search box and open the application.

3. On the Device Manager window, double-click on Display adapters to expand it.
4. You will find the graphics card driver in use.
5. Right-click on it and choose the Update driver option.

6. Now, click on Search automatically for drivers and wait for some time to finish the driver update.

7. Once done, restart your PC.
Conclusion
We have mentioned all the troubleshooting methods you can follow to fix blurry screens on Windows 10/11. Make sure to perform each technique carefully, as shown here, to avoid any system glitches. Whether it’s just a pixelated app UI or blurry text, you can fix it with the methods shared here. Additionally, keep your Windows OS up-to-date.
You may also be interested in reading about these tweaks to improve Windows performance.