Summary of Program Arduino Pro Mini Using Arduino Uno
This article explains how to program an Arduino Pro Mini using an Arduino Uno without needing a USB-to-serial converter. It emphasizes using the 5V 16MHz Pro Mini, which is compatible with the Arduino Uno. The process involves removing the IC from the Arduino Uno, wiring the Uno's 5V, GND, TX, RX, and RESET pins to the corresponding Pro Mini pins, and selecting the correct board setting in the Arduino IDE before uploading the code. This method allows the Arduino Uno to act as a programmer for the Pro Mini.
Parts used in the Arduino Pro Mini Programming Project:
- Arduino Uno board
- Arduino Pro Mini (5V, 16MHz)
- Connecting wires
- Computer with Arduino IDE software
Hello everyone. Today I am going to show how to program arduino pro mini using arduino uno.
If you already had a arduino uno and you newly buy arduino pro mini then you don’t need to buy the USB to serial converter to program the arduino pro mini because you can program pro mini using your arduino uno board. We can make pro mini to act as a central ic for arduino uno board. First of all you have to know which arduino pro mini you are using either it is 5v 16mhz or 3.3v 8mhz. Use only 5 Volt and 16MHZ pro mini with the arduino uno. we can’t program 3.3v 8mhz pro mini with arduino uno. Here i am using 5v 16mhz pro mini.Let us see the circuit connection.
Step 1: Video
Instead of reading you can watch video for full description
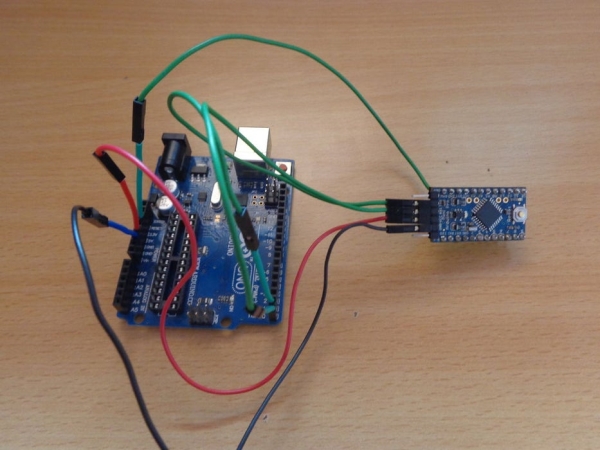
Step 2: Connect Pro Mini With Arduino Uno
Follow the simple steps bellow: the circuit connection
clearly shown in the video
Remove the ic in arduino uno board.
- Connect arduino uno board 5V pin to pro mini’s VCC pin.
- Connect arduino uno board GND pin to pro mini’s GND pin.
- Connect arduino uno board TX pin to pro mini’s TX0 pin.
- Connect arduino uno board RX pin to pro mini’s RXI pin
- Connect arduino uno board RESET pin to pro mini’s RST pin.
Step 3: Open Arduino Software for Program the Pro Mini

Connect the all circuit connection now open the arduino software and select tools->Board ->Ardunio Pro or Pro Mini(5V, 16MHZ) vv/ ATmega328. if you select the arduino pro you can see the selected board in the bottom of the software as shown in above image.
And open the coding you want to program and click the upload button. Now you can see that program uploading into pro mini. you can see the tx and rx led in arduino uno board blinking while program uploading . after uploading of the code. now remove the all connection and give power supply to the pro mini. your code works perfectly on arduino mini. enjoy projects with pro mini. watch the video for to clearly see how to do all steps.
Thank you for reading.
Source: Program Arduino Pro Mini Using Arduino Uno