Category:Trams in Adelaide
Zur Navigation springen
Zur Suche springen
history and description of trams in Adelaide, South Australia   | |||||
| Medium hochladen | |||||
| Ist ein(e) |
| ||||
|---|---|---|---|---|---|
| Ist Teil von | |||||
| Ort | Adelaide, Süd-Australien, Australien | ||||
| Betreiber |
| ||||
| Besteht aus | |||||
| Eröffnungsdatum |
| ||||
| offizielle Website | |||||
| |||||
Unterkategorien
Es werden 4 von insgesamt 4 Unterkategorien in dieser Kategorie angezeigt:
In Klammern die Anzahl der enthaltenen Kategorien (K), Seiten (S), Dateien (D)
Medien in der Kategorie „Trams in Adelaide“
Folgende 200 Dateien sind in dieser Kategorie, von 209 insgesamt.
(vorherige Seite) (nächste Seite)-
 1918 MTT street tramcar design.png 7.015 × 4.121; 9,54 MB
-

-
 1960 GOING SHOPPING TO THE CITY (2475908352).jpg 2.404 × 1.549; 655 KB
-
 Adelaide (6518213719) (2).jpg 683 × 395; 105 KB
-

-

-
 Adelaide horse tram ca. 1908 (SLSA B-19616-3).jpg 639 × 389; 243 KB
-
 Adelaide horse tram no. 18 at Tramway Museum, St Kilda (background removed).png 4.397 × 6.764; 29,59 MB
-

-

-
 Adelaide MTT tram Type C 186 leaves Shell Street St Kilda (RTHorne 1-3-2009) CNV00083.jpg 3.712 × 2.592; 10,86 MB
-
 Adelaide MTT tram Type D 192 in St Kilda museum yard (RTHorne 1-3-2009) CNV00067.jpg 3.683 × 2.455; 3,1 MB
-
 Adelaide MTT tram Type H (small sketch) side elevation.png 896 × 259; 134 KB
-
 Adelaide MTT tram Type H1 381 at St Kilda beach (RTHorne 28-10-2017) IMG 0019.jpg 3.742 × 2.494; 9,88 MB
-

-
 Adelaide Municiap Tramway Trust Club Room(GN01547).jpg 3.264 × 2.448; 995 KB
-
 Adelaide Municipal Tramway Trust Barn(GN01545).jpg 3.264 × 2.448; 1,01 MB
-
 Adelaide Municipal Tramway Trust Club Room(GN01549).jpg 3.264 × 2.448; 1,01 MB
-
 Adelaide Municipal Tramway Trust Lavatories(GN01546).jpg 3.264 × 2.448; 1.017 KB
-
 Adelaide Municipal Tramway Trust Lavatories, Hackney Depot(GN01550).jpg 3.264 × 2.448; 999 KB
-
 Adelaide Municipal Tramway Trust Mess Room, Hackney Depot(GN01551).jpg 3.264 × 2.448; 985 KB
-
 Adelaide Railway Station(GN13501).jpg 3.264 × 2.448; 763 KB
-
 Adelaide tram number 1 on trial run in North Tce 30 Nov 1908.jpg 4.412 × 2.937; 11,71 MB
-
 Adelaide trams of the four main eras -- montage, cropped tight.jpg 3.174 × 994; 2,78 MB
-
 Adelaide trams of the four main eras -- montage, grey surrounds.jpg 3.299 × 1.185; 2,58 MB
-
 Adelaide trams of the four main eras -- montage.png 3.172 × 970; 4,62 MB
-
 Adelaide Type A tram 66 en route to Kilkenny via Croydon ca 1930 (SLSA B 69647).jpg 2.880 × 1.499; 2,33 MB
-

-
 Adelaide Type A2 tram 42 in St Vincent Street, Port Adelaide, 21 Feb 1919 (SLSA B 5518).jpg 3.015 × 1.644; 1,46 MB
-
 Adelaide type B tram no 42 at Tramway Museum, St Kilda.jpg 1.789 × 1.373; 356 KB
-

-
 Adelaide Type B trams 44 43 & 46 in Victoria Square (SLSA B 22795 cropped).jpg 3.041 × 1.588; 1,02 MB
-
 Adelaide Type C tram 179 in Currie St at King William St 16 Oct 1953.jpg 1.579 × 980; 392 KB
-

-
 Adelaide Type F1 and H trams end elevation (MTT original).png 4.917 × 6.839; 5,77 MB
-
 Adelaide Type F1 and H trams end elevation (traced).png 4.888 × 6.877; 4,46 MB
-
 Adelaide Type H tram end elevation (traced).png 2.406 × 3.402; 2,06 MB
-
 Adelaide types E and H trams and Melbourne W2 class at Tramway Museum, St Kilda.jpg 3.723 × 2.284; 8,13 MB
-
 Aerial photo of Adelaide's Hackney tram depot, Oct 1951.jpg 1.280 × 526; 330 KB
-
 Alstom Citadis 302 segment in storage facility, Madrid, 2009.jpg 1.145 × 1.248; 398 KB
-
 Alstom Citadis 302 tram for Adelaide on Melbourne wharf, 2009.jpg 604 × 494; 113 KB
-
 Alstom Citadis 302 trams in storage, Madrid, 2009.jpg 5.327 × 3.100; 10,09 MB
-
 Bird's-eye view of Glenelg train in Adelaide, 1875.jpg 6.988 × 3.364; 14,52 MB
-
 Bombardier Flexity tram from Glenelg passes SA Supreme Court, King William Street bw.jpg 3.900 × 2.091; 3,49 MB
-
 Bombardier Flexity tram interior during assembly (cropped).jpg 619 × 562; 155 KB
-
 Bombardier Flexity tram interior during assembly.jpg 619 × 827; 201 KB
-
 Bus in street, Colonel Light Gardens(GN12906).jpg 3.264 × 2.448; 865 KB
-
 Centenary Electric Tram(GN10035).jpg 3.264 × 2.448; 998 KB
-
 Cheque Being Handed Over to Tramway Company(GN05604).jpg 3.264 × 2.448; 912 KB
-
 Citadis and Flexity trams cross on North Terrace, Adelaide, 14 Oct 2018 (Henk Graalman).jpg 4.295 × 3.071; 4,29 MB
-

-
 Composite image of 3 Adelaide trams -- horse tram, Type H and Type 200.jpg 6.741 × 2.698; 11,63 MB
-
 Contrast Opposite Reverse Contradict Antipode (2649633503).jpg 1.024 × 768; 384 KB
-

-

-
 Diagram of Municipal Tramways Trust Poles(GN03834).jpg 3.264 × 2.448; 751 KB
-
 Drawing of Glenelg tram line car, proposed, 1909.png 6.978 × 2.849; 3,78 MB
-
 Drawings of Glenelg tram line cars -- proposed 1909 and as built 1929.png 7.015 × 4.960; 14,15 MB
-
 Duncan and Fraser newspaper advert (trams) ca 1910.jpg 5.002 × 3.702; 5,65 MB
-
 E1 111 side profile, March 2009.jpg 2.999 × 1.381; 4,73 MB
-
 Electric Cars opening by Mrs Price, wife of the Premier of South Australia(GN11388).jpg 2.847 × 2.234; 638 KB
-

-
 F1 type tram 282.JPG 1.156 × 718; 423 KB
-
 First tramrun adelaide nov1908.jpg 719 × 445; 169 KB
-

-
 Flexity tram testing switch assemblies at Glengowrie depot, April 2006.jpg 1.600 × 1.200; 2,1 MB
-
 Flooded tram line, Adelaide 1917(GN01958).jpg 3.264 × 2.448; 945 KB
-

-
 Glenelg Railway Co. employees and locomotives at St Leonard's depot, 1881-1899.jpg 2.048 × 1.421; 1,25 MB
-

-

-
 Glenelg train ca 1890, tram 2018 King William Street Adelaide.jpg 4.323 × 5.270; 7,42 MB
-
 Hackney Tram Depot, 1909 (SLSA, B 28639).jpg 1.421 × 1.012; 225 KB
-
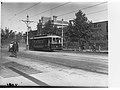
 Henley Beach Road, Mile End tram at Fisher Street Crossing(GN01707).jpg 3.264 × 2.448; 922 KB
-
 Holland Street at Southwark (Thebarton), c1916(GN02302).jpg 3.264 × 2.448; 904 KB
-
 Horse tram 79, probably Kensington depot, ca 1909 (SLSA B 11037).jpg 896 × 603; 567 KB
-
 Horse tram and electric tram, North Terrace, Adelaide, 1909 (SLSA B-4364).jpg 1.008 × 697; 415 KB
-

-
 Horse tram and electric trams North Adelaide about 1909 (SLSA B8225).jpg 1.024 × 424; 452 KB
-

-
 Horse tram at depot, Unley (SLSA PRG-280-1-43-312).jpg 933 × 710; 507 KB
-
 Horse tram at intersection of King William Street and Rundle Street ca 1909.jpg 1.014 × 631; 629 KB
-
 Horse tram depot, Mitcham, 1879 -- weekendnotes.com--adelaides-public-transport.jpg 1.835 × 1.146; 2,17 MB
-
 Horse tram Glenelg-Brighton-Marino Tramways ca 1905 (SLSA B 19668).jpg 963 × 674; 464 KB
-

-
 Horse tram to Magill ca 1880 (SLSA B 26075).jpg 680 × 451; 273 KB
-
 Horse tram track and workers, Mitcham, ca 1880 (SLSA B-36052).jpg 951 × 694; 591 KB
-
 Horse trams and carriages, King William Street, Adelaide, ca 1885 (SW Sweet).jpg 2.861 × 1.736; 2,09 MB
-
 Horse trams loading on Wakefield Street Adelaide, ca 1909 (SLSA B-4398).jpg 1.024 × 764; 687 KB
-

-
 Kensington Gardens - Shows Tram(GN11314).jpg 3.264 × 2.448; 866 KB
-
 King William Road, Adelaide, South Australia 1923.jpg 1.030 × 657; 185 KB
-
 King William St – North Tce tram intersection, Adelaide 2018.png 3.507 × 1.121; 851 KB
-
 King William Street looking north(GN09155).jpg 3.264 × 2.448; 852 KB
-
 King William Street looking south from GPO, showing trams(GN10496).jpg 3.264 × 2.448; 971 KB
-
 King William Street looking south from Hindley Street(GN11725).jpg 3.264 × 2.448; 781 KB
-
 King William Street Looking South Showing Carts and Trams(GN08335).jpg 3.264 × 2.448; 950 KB
-
 King William Street Looking South(GN04260).jpg 3.264 × 2.448; 1.003 KB
-
 King William Street showing Automobiles(GN07563).jpg 3.264 × 2.448; 835 KB
-
 King William Street Showing Trams and Victoria Square(GN08545).jpg 3.106 × 2.380; 979 KB
-
 King William Street, Adelaide(GN02744).jpg 3.264 × 2.448; 898 KB
-
 King William Street, Adelaide(GN12812).jpg 3.264 × 2.448; 900 KB
-

-
 Melbourne W2 class tram 294 on line of Tramway Museum, St Kilda (JCRadcliffe).jpg 3.800 × 2.856; 4,88 MB
-
 Melbourne W7 class tram 1013 at St Kilda Playground stop 10 Jun 2013 (JCRadcliffe).jpg 3.276 × 2.488; 5,86 MB
-
 MMMTT Type F1 tram no. 283 (for Hyde Park) at Victoria Square south on 26 Feb 1955.jpg 2.912 × 1.393; 2,86 MB
-

-
 MTT (Adelaide) Type F car 201, new, 17 March 1922 -- (SLSA B-836).jpg 1.013 × 521; 416 KB
-
 MTT Adelaide tram Type A (small sketch) cream bkgrd.jpg 800 × 238; 116 KB
-
 MTT Adelaide tram Type A (small sketch).png 864 × 252; 119 KB
-
 MTT Adelaide tram Type A1 (small sketch) cream bkgrd.jpg 800 × 243; 120 KB
-
 MTT Adelaide tram Type A1 (small sketch).png 879 × 265; 123 KB
-
 MTT Adelaide tram Type A2 (small sketch) cream bkgrd.jpg 800 × 242; 109 KB
-
 MTT Adelaide tram Type A2 (small sketch).png 885 × 264; 116 KB
-
 MTT Adelaide tram Type B (small sketch) cream bkgrd.jpg 800 × 246; 123 KB
-
 MTT Adelaide tram Type B (small sketch).png 867 × 261; 123 KB
-
 MTT Adelaide tram Type C (small sketch) cream bkgrd.jpg 800 × 234; 103 KB
-
 MTT Adelaide tram Type C (small sketch).png 803 × 235; 99 KB
-
 MTT Adelaide tram Type D (small sketch) cream bkgrd.jpg 800 × 234; 128 KB
-
 MTT Adelaide tram Type D (small sketch).png 977 × 277; 158 KB
-
 MTT Adelaide tram Type E (small sketch) cream bkgrd.jpg 800 × 234; 132 KB
-
 MTT Adelaide tram Type E (small sketch).png 1.232 × 356; 202 KB
-
 MTT Adelaide tram Type E1 (small sketch) cream bkgrd.jpg 800 × 235; 125 KB
-
 MTT Adelaide tram Type E1 (small sketch).png 939 × 260; 166 KB
-
 MTT Adelaide tram Type F (side view).png 800 × 275; 175 KB
-
 MTT Adelaide tram Type F (small sketch) cream bkgrd.jpg 800 × 217; 126 KB
-
 MTT Adelaide tram Type F (small sketch).png 997 × 279; 181 KB
-
 MTT Adelaide tram Type G (small sketch) cream bkgrd.jpg 800 × 334; 136 KB
-
 MTT Adelaide tram Type G (small sketch).png 764 × 290; 109 KB
-
 MTT Adelaide tram Type H (small sketch) cream bkgrd.jpg 800 × 216; 123 KB
-
 MTT Adelaide tram Type H (small sketch).png 1.000 × 254; 159 KB
-
 MTT Adelaide tram Type H1 (small sketch) cream bkgrd.jpg 800 × 216; 122 KB
-
 MTT Adelaide tram Type H1 (small sketch).png 1.000 × 264; 169 KB
-
 MTT Hackney tram depot, Adelaide -- Type H and F trams at entrance to 'A' Bay, Dec 1957.jpg 2.878 × 1.748; 1,94 MB
-
 MTT Type A1 tram no. 55 at Victoria Square std rd ca 1917.jpg 991 × 597; 233 KB
-
 MTT Type D tram no. 160, Victoria Square north near Wakefield St, 25 Apr 1956.jpg 1.971 × 1.144; 1,55 MB
-
 MTT Type E1 tram no. 110 at Findon terminus, last day of operation, 18 Oct 1953.jpg 1.943 × 1.140; 1,39 MB
-
 MTT Type F tram no. 227 at Peacock Road near South Terrace, Adelaide, 9 June 1956.jpg 4.014 × 2.566; 4,69 MB
-
 MTT Type F1 tram no. 264 at Peacock Rd nr South Terrace, 9 Nov 1957.jpg 2.884 × 1.660; 2,8 MB
-

-

-
 Municipal Tramways Trust (MTT) crest.png 3.649 × 2.749; 6,05 MB
-
 Municipal Tramways Trust Plans - office depot and workshops, Hackney(GN03841).jpg 3.264 × 2.448; 1,07 MB
-
 North Terrace from Lister House Looking North East(GN08554).jpg 3.264 × 2.448; 976 KB
-
 North Terrace in 1938.jpg 993 × 683; 187 KB
-
 North Terrace in the city showing trams near Kintore Avenue(GN12850A).jpg 3.264 × 2.448; 777 KB
-
 North Terrace Looking East Showing Trams and Automobiles(GN08256).jpg 3.264 × 2.448; 1,03 MB
-
 North Terrace looking east(GN12798).jpg 3.264 × 2.448; 874 KB
-
 North Terrace Looking West Showing Trams and Buses(GN08253).jpg 3.264 × 2.448; 1,07 MB
-
 North Terrace showing trams and automobiles(GN09167).jpg 2.448 × 3.264; 1,03 MB
-
 Partially assembled tram body (MTT Type E), Brill Company, Philadelphia 1910.jpg 5.821 × 2.787; 6,08 MB
-
 Photos of Adelaide's Municipal Tramways Trust inaugural directors and staff, 1909.jpg 1.709 × 1.190; 886 KB
-
 Plan of the metropolitan public street transport system of Adelaide, May 1952.png 4.960 × 7.014; 41,25 MB
-
 Refurbished 300 Series trams 370 and 380, North Tce, Adelaide, January 2009.jpg 1.950 × 1.379; 2,6 MB
-

-

-

-

-
 Simulation of a tram accident - lady next to a tram(GN13864).jpg 3.264 × 2.448; 930 KB
-
 Simulation of tram accident - lady next to the tram(GN13810).jpg 3.264 × 2.448; 738 KB
-
 Simulation of tram accident - lady next to the tram(GN13811).jpg 3.264 × 2.448; 656 KB
-
 Simulation of tram accident - showing lady lying on ground next to tram(GN03562).jpg 3.264 × 2.448; 1,03 MB
-
 Simulation of tram accident - showing lady standing next to tram(GN03561).jpg 3.264 × 2.448; 1,09 MB
-
 Simulation of tram accident - showing lady standing next to tram(GN03564).jpg 3.106 × 2.342; 855 KB
-
 Sketch -- Adelaide 100 Series (Flexity Classic) tram on cream background.jpg 3.341 × 647; 461 KB
-
 Sketch -- Adelaide 100 Series (Flexity Classic) tram.jpg 3.308 × 628; 354 KB
-
 Sketch -- Adelaide 200 Series (Citadis 302) tram.png 815 × 119; 93 KB
-
 Sketch -- Adelaide Citadis 302 on cream background.png 6.743 × 1.149; 1,95 MB
-
 Sketch -- Adelaide Type H tram on cream background.png 5.921 × 2.001; 2,4 MB
-
 Sketch of early Adelaide, c. 1875(GN01245A).jpg 2.894 × 2.136; 1,06 MB
-
 Steam wagon equipped as a tan sprayer(GN13734).jpg 3.264 × 2.448; 952 KB
-
 Street Scene Showing Tram and Automobile(GN09005A).jpg 3.264 × 2.448; 805 KB
-
 Surfacing a road with bitumen(GN13619).jpg 3.264 × 2.448; 920 KB
-
 Sydney R1 class tram 1971 at St Kilda SA Playground stop, 2 Jan 2006 (JCRadcliffe).jpg 2.224 × 1.550; 2,61 MB
-
 The opening of the glenelg tram.jpg 459 × 288; 29 KB
-
 Three Conductors in Front of Horse Drawn Tram(GN05229).jpg 3.264 × 2.448; 1,01 MB
-

-
 Timeline chart -- Adelaide's tram systems 1878 to 2022.tif 2.308 × 1.285; 11,32 MB
-

-
 Tram and bus at Victoria Square, Adelaide.jpg 4.608 × 3.456; 12,13 MB
-
 Tram carriage decorated for state, electric tram(GN10025).jpg 3.264 × 2.448; 861 KB
-
 Tram Depot at Kensington(GN05351).jpg 3.264 × 2.448; 615 KB
-
 Tram in King William Street in front of Criterion Hotel(GN13731).jpg 3.264 × 2.448; 953 KB
-
 Tram in Victoria Square, Adelaide in 1911.jpg 1.024 × 687; 343 KB
-
 Tram on North Terrace(GN11392).jpg 3.264 × 2.448; 902 KB
-
 Tram on Road Near Saint Peters Cathedral(GN04441).jpg 3.264 × 2.448; 1,16 MB
-
 Tram showing conductors lined up along the side(GN11361).jpg 3.264 × 2.448; 789 KB
-
 Tram staff posing in front of tram - Parkside-Unley-Malvern(GN03216).jpg 3.264 × 2.448; 1,14 MB
-
 Tram track construction in King William St, near Waymouth St, Adelaide, 20 May 2007.jpg 1.808 × 1.350; 2,07 MB
-
 Tram(GN11963).jpg 3.264 × 2.448; 1,78 MB
-

-
 Trams on King William Street in 1909.jpg 1.024 × 786; 281 KB
-
 Trams over the Torrens, 1914 (14587352320).jpg 1.200 × 829; 177 KB
-
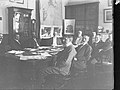
 Tramways Trust at Work - Tramway Board Members in Chief Secretary's Room(GN00317A).jpg 3.264 × 2.448; 1,03 MB
-
 Tramways Trust at Work - Tramway Board Members in Chief Secretary's Room(GN00319A).jpg 3.264 × 2.448; 985 KB
-

-

-
 Type H Glenelg tram interior 2005.jpg 1.745 × 1.139; 2,05 MB
-
 Type H tram 364 between Stops 11 and 12, Glenelg line, July 1972.jpg 2.612 × 1.772; 2,5 MB
-
 Unley Road, Unley - Town Planning negatives(GN02295).jpg 3.264 × 2.448; 891 KB

.jpg)
.jpg)
_(2).jpg)
.jpg)
.jpg)
.jpg)
.png)
.jpg)
.jpg)
_CNV00083.jpg)
_CNV00067.jpg)
_IMG_0019.jpg)
.jpg)
.jpg)
.jpg)
.jpg)
.jpg)
.jpg)
.jpg)
.jpg)

.jpg)
.jpg)
.jpg)


.jpg)


.png)
.png)
.png)


.jpg)

.jpg)
.jpg)
.jpg)
.jpg)

.jpg)
.jpg)
.jpg)
.jpg)

_ca_1910.jpg)

.jpg)
.jpg)


.jpg)

.jpg)
_No.1_Converter_Station,_52-60_East_Terrace,_Adelaide,_February_2023.jpg)

,_King_William_Street_terminus,_Adelaide,_1899-1908_(SLSA_B-4397).jpg)
.jpg)

.jpg)
.jpg)
,_c1916(GN02302).jpg)
.jpg)
.jpg)
.jpg)
.jpg)
.jpg)
.jpg)

.jpg)
.jpg)
.jpg)
.jpg)
.jpg)
.jpg)
.jpg)
.jpg)

.jpg)
.jpg)
.jpg)
.jpg)
.jpg)
.jpg)
.jpg)
.jpg)
.jpg)
.jpg)
.jpg)
.jpg)
_at_Victoria_Square_south_on_26_Feb_1955.jpg)
.jpg)
_Type_F_car_201,_new,_17_March_1922_--_(SLSA_B-836).jpg)
_cream_bkgrd.jpg)


.jpg)
_crest.png)
.jpg)
.jpg)

.jpg)
.jpg)
.jpg)
.jpg)
.jpg)
,_Brill_Company,_Philadelphia_1910.jpg)


_tram_303_on_Glenelg_line_level_crossing_over_Greenhill_Road,_Adelaide,_Jun_1978_(Henk_Graalman).jpg)
(GN02540).jpg)
.jpg)
.jpg)
.jpg)
.jpg)
.jpg)
.jpg)
.jpg)
.jpg)
.jpg)
.jpg)
.jpg)
.jpg)
.jpg)

.jpg)
.jpg)
_and_horse_tram,_O%27Connell_and_Ward_Streets_intersection,_North_Adelaide_ca_1909_(SLSA_B8225_cropped).jpg)

.jpg)
.jpg)
.jpg)

.jpg)
.jpg)
.jpg)
.jpg)

.jpg)
.jpg)

.jpg)
.jpg)
.jpg)
.jpg)
,_Currie_Street,_Adelaide_1917_(SLSA_PRG-733-12).jpg)


.jpg)
_side_elevation.png)
_cream_bkgrd.jpg)
.png)
_cream_bkgrd.jpg)
.png)
_cream_bkgrd.jpg)
.png)
_cream_bkgrd.jpg)
.png)
_cream_bkgrd.jpg)
.png)
_cream_bkgrd.jpg)
.png)
_cream_bkgrd.jpg)
.png)
_cream_bkgrd.jpg)
.png)
.png)
_cream_bkgrd.jpg)
.png)
.png)
_cream_bkgrd.jpg)
.png)
_cream_bkgrd.jpg)
.png)
_tram_on_cream_background.jpg)
_tram.jpg)
_tram.png)