Connect to public AdGuard DNS servers
Quickly block ads, trackers, malware, and adult websites with the help of the free public AdGuard DNS servers
Option 1: Install AdGuard Recommended
This is the fastest and the easiest way. Simply install AdGuard Ad Blocker on your device, go to the app’s server settings, and select AdGuard DNS. No need to enter DNS server addresses manually!
In addition to DNS, you’ll get precise ad blocking and advanced tracking protection
Protect your Windows device at the system level
Protect your Mac device without installing extra software
Block ads, trackers, and threats everywhere on your Android device
Enjoy an ad-free experience on your iOS device — in browsers and apps
Option 2: Configure AdGuard DNS manually
If you prefer to configure the public AdGuard DNS server manually, we have everything ready for you. Select your device platform and get setup instructions
Go to Settings → Network & Internet (or Wi-Fi & Internet)
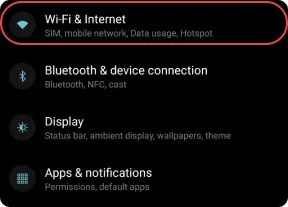
Select Advanced → Private DNS.
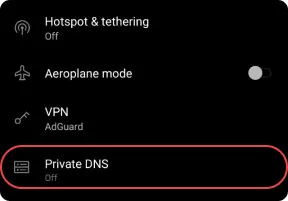
Select Private DNS provider hostname. Enter one of the servers below:
Default server
dns.adguard-dns.com
AdGuard DNS will block ads and trackers.
Non-filtering server
unfiltered.adguard-dns.com
AdGuard DNS will not block ads, trackers, or any other DNS requests.
Family protection server
family.adguard-dns.com
AdGuard DNS will block ads, trackers, adult content, and enable Safe Search and Safe Mode, where possible.
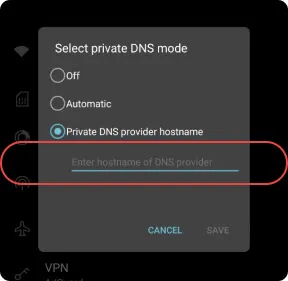
Tap Save.
To get a generic configuration profile, select a DNS server below and tap Download configuration profile. For a custom configuration profile, tap Open profile constructor.
Profile constructor
Generate a configuration profile for iOS/macOS that will use AdGuard DNS natively.
1. Select a DNS server and encryption type.
2. Disable AdGuard DNS for the Wi-Fi networks below.
3. Disable AdGuard DNS for the domains (and their subdomains) below.
Open the Settings app on your device.
Tap Profile Downloaded.
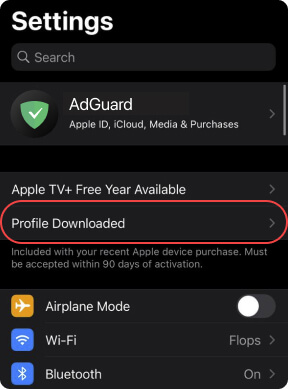
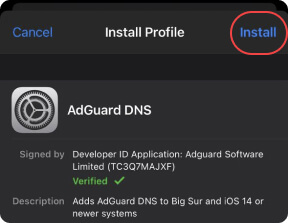
Tap Install and follow the onscreen instructions.
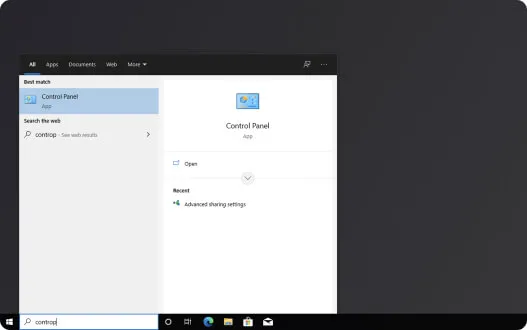
Go to Start menu → Control Panel.
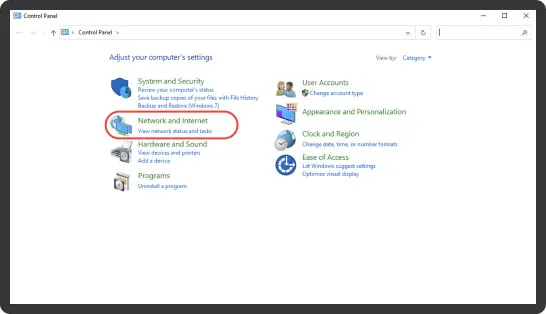
Select Network and Internet.
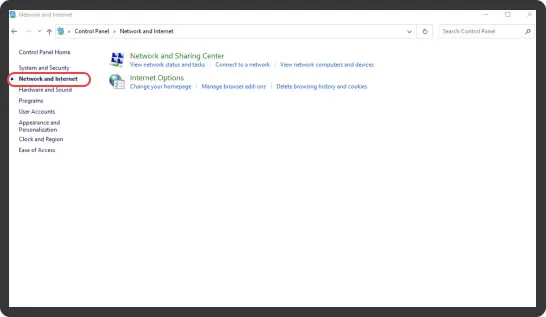
Click Network and Sharing Center.
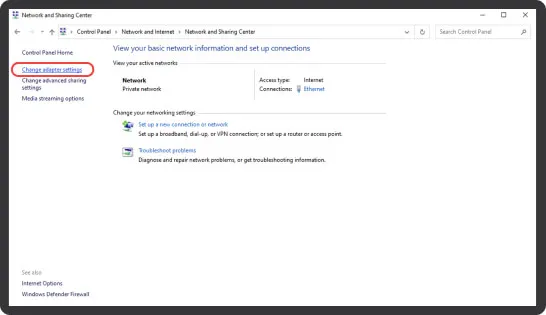
In the left panel, select Change Adapter Settings.
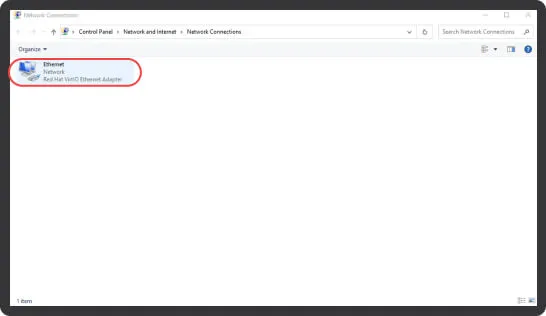
Click the Wi-Fi network to which you are connected.
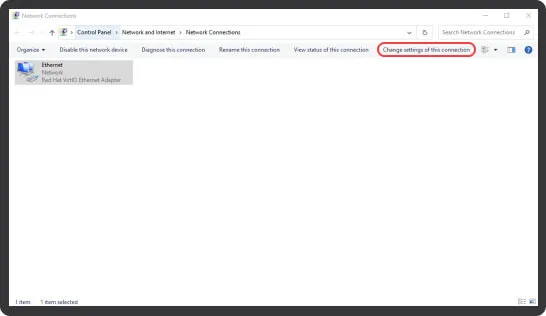
In the option bar, select Change settings of this connection. If the option is hidden, click the chevron icon.
Alternatively, right-click the connection icon and select Properties.
Select Internet Protocol Version 4 (TCP/IPv4).
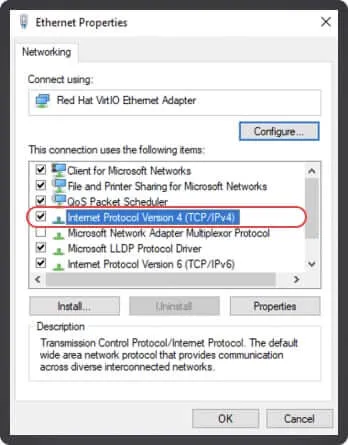
Click Properties.
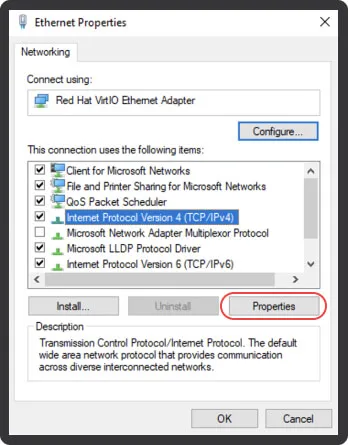
Select Use the following DNS server addresses.
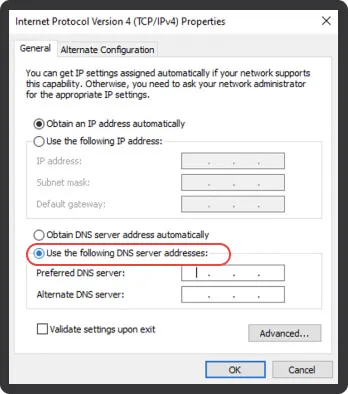
Enter the addresses of one of the servers below as Preferred DNS server and Alternate DNS server.
Default servers
AdGuard DNS will block ads and trackers.
94.140.14.14
94.140.15.15
Non-filtering servers
AdGuard DNS will not block ads, trackers, or any other DNS requests.
94.140.14.140
94.140.14.141
Family protection servers
AdGuard DNS will block ads, trackers, adult content, and enable Safe Search and Safe Mode, where possible.
94.140.14.15
94.140.15.16
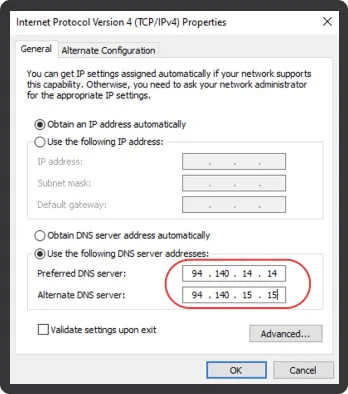
Click OK.
Select Internet Protocol Version 6 (TCP/IPv6) and click Properties.
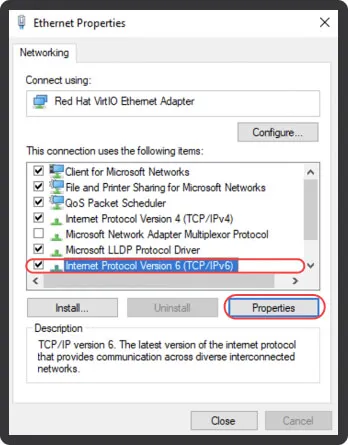
Select Use the following DNS server addresses.
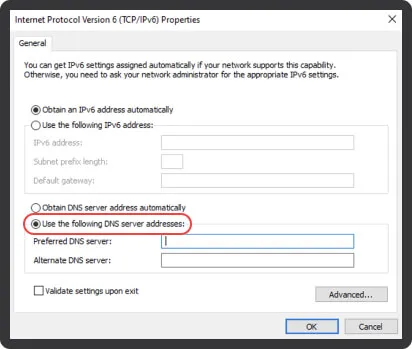
Enter the addresses of one of the servers below as Preferred DNS server and Alternate DNS server.
Default servers
AdGuard DNS will block ads and trackers.
2a10:50c0::ad1:ff
2a10:50c0::ad2:ff
Non-filtering servers
AdGuard DNS will not block ads, trackers, or any other DNS requests.
2a10:50c0::1:ff
2a10:50c0::2:ff
Family protection servers
AdGuard DNS will block ads, trackers, adult content, and enable Safe Search and Safe Mode, where possible.
2a10:50c0::bad1:ff
2a10:50c0::bad2:ff
Click OK.
Click Close.
Instructions for Big Sur 11.6 and above
Choose a DNS server according to your preferences and press the button to download a configuration profile.
Profile constructor
Generate a configuration profile for iOS/macOS that will use AdGuard DNS natively.
1. Select a DNS server and encryption type.
2. Disable AdGuard DNS for the Wi-Fi networks below.
3. Disable AdGuard DNS for the domains (and their subdomains) below.
Open the Settings app on your device.
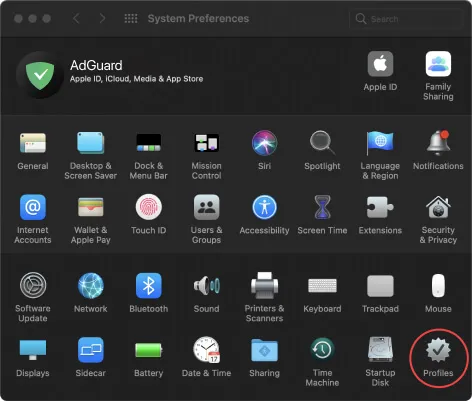
Select Profiles.
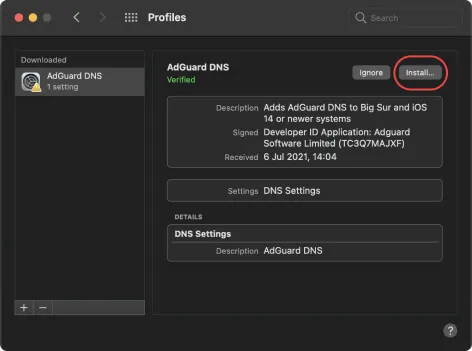
Select the downloaded AdGuard DNS profile and click Install.
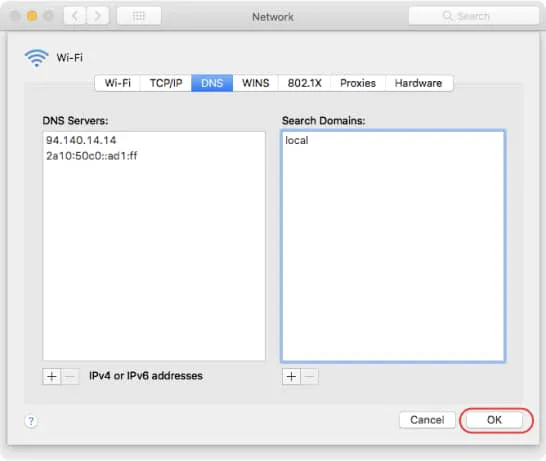
Instructions for older macOS versions
Open the Settings app on your device.
Select Network.
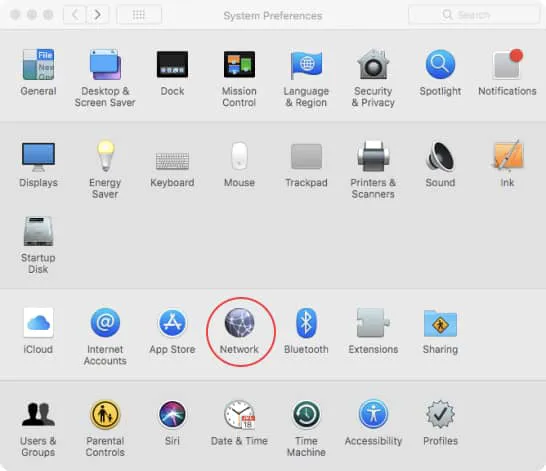
Select your network interface from the sidebar.
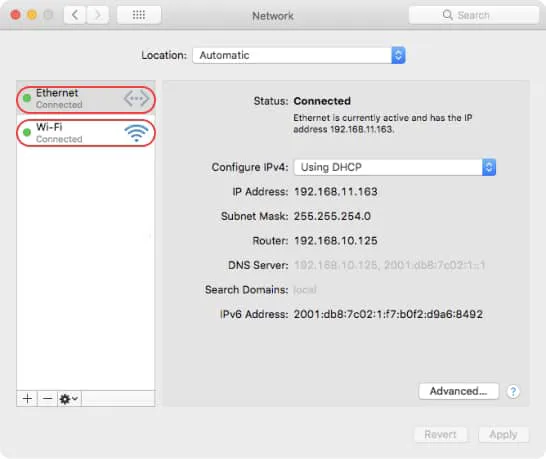
Click Advanced.
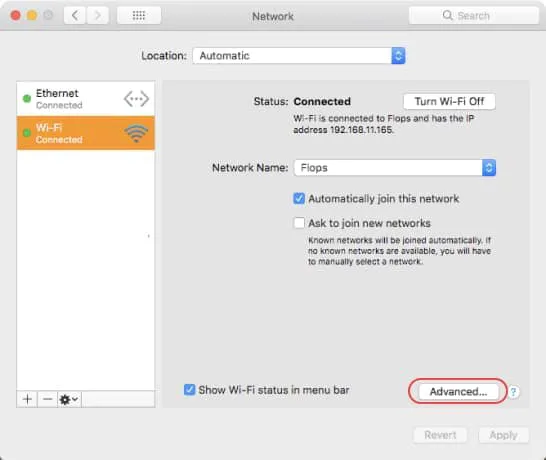
Select the DNS tab.
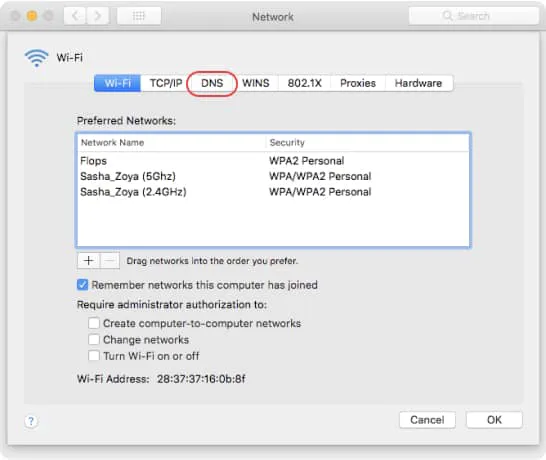
Click the Add button at the bottom of the DNS Servers list. Enter the IPv4 or IPv6 addresses for the required DNS servers from below.
Default servers
AdGuard DNS will block ads and trackers.
94.140.14.14
94.140.15.15
Non-filtering servers
AdGuard DNS will not block ads, trackers, or any other DNS requests.
94.140.14.140
94.140.14.141
Family protection servers
AdGuard DNS will block ads, trackers, adult content, and enable Safe Search and Safe Mode, where possible.
94.140.14.15
94.140.15.16
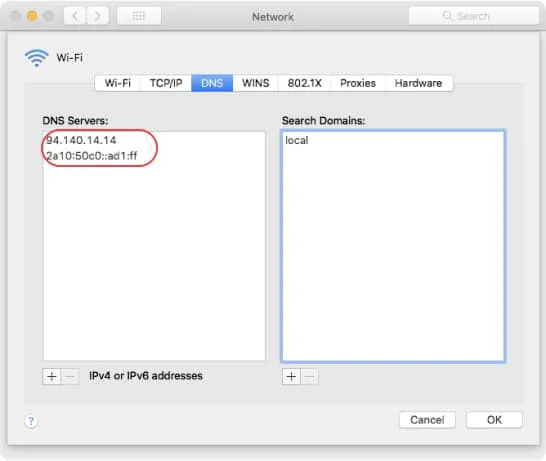
Click OK.
AdGuard Home
Try AdGuard Home, a powerful instrument to block ads and trackers and manage your home network. Once installed and configured, AdGuard Home protects ALL devices connected to your home Wi-Fi without requiring any client software.
For more information, visit our GitHub repository.
Ubuntu
Open System or System Settings, depending on your version.
Select Wi-Fi for wireless connections or Network for cable connections and click the cogwheel next to the required connection.
Select IPv4.
Enter the addresses of one of the DNS servers below.
Default servers
AdGuard DNS will block ads and trackers.
94.140.14.14
94.140.15.15
Non-filtering servers
AdGuard DNS will not block ads, trackers, or any other DNS requests.
94.140.14.140
94.140.14.141
Family protection servers
AdGuard DNS will block ads, trackers, adult content, and enable Safe Search and Safe Mode, where possible.
94.140.14.15
94.140.15.16
Turn off the Automatic switch next to the DNS field.
Click Apply.
Select IPv6.
Enter the addresses of one of the DNS servers below.
Default servers
AdGuard DNS will block ads and trackers.
2a10:50c0::ad1:ff
2a10:50c0::ad2:ff
Non-filtering servers
AdGuard DNS will not block ads, trackers, or any other DNS requests.
2a10:50c0::1:ff
2a10:50c0::2:ff
Family protection servers
AdGuard DNS will block ads, trackers, adult content, and enable Safe Search and Safe Mode, where possible.
2a10:50c0::bad1:ff
2a10:50c0::bad2:ff
Turn off the Automatic switch next to the DNS field.
Click Apply.
Restart your network to apply changes.
Debian
Open the Terminal.
In the command line, type:
suEnter the root password.
In the command line, enter:
nano /etc/resolv.confWhen the text editor opens, type in the addresses of one of the servers below.
Default servers
AdGuard DNS will block ads and trackers.
IPv4:
94.140.14.14
94.140.15.15
IPv6:
2a10:50c0::ad1:ff
2a10:50c0::ad2:ff
Non-filtering servers
AdGuard DNS will not block ads, trackers, or any other DNS requests.
IPv4:
94.140.14.140
94.140.14.141
IPv6:
2a10:50c0::1:ff
2a10:50c0::2:ff
Family protection servers
AdGuard DNS will block ads, trackers, adult content, and enable Safe Search and Safe Mode, where possible.
IPv4:
94.140.14.15
94.140.15.16
IPv6:
2a10:50c0::bad1:ff
2a10:50c0::bad2:ff
Press Ctrl+O to save the file.
Press Enter.
Press Ctrl+X to quit the editor.
In the command line, enter:
/etc/init.d/networking restartPress Enter.
Close the Terminal.
Open your router preferences. Usually, you can access them via your browser. Look at router models below for possible addresses.
Linksys and Asus routers: http://192.168.1.1
Netgear routers: http://192.168.0.1 or http://192.168.1.1
D-Link routers: http://192.168.0.1
Ubiquiti routers: http://unifi.ubnt.com
Enter the router password.
Note: make sure you record the router password in a safe place. Some router models have specific password-management applications: if it’s your case, the application should be already installed on your computer.
Go to DNS settings in the router admin page. Replace DNS addresses with the addresses of one of the servers below.
Default servers
AdGuard DNS will block ads and trackers.
IPv4:
94.140.14.14
94.140.15.15
IPv6:
2a10:50c0::ad1:ff
2a10:50c0::ad2:ff
Non-filtering servers
AdGuard DNS will not block ads, trackers, or any other DNS requests.
IPv4:
94.140.14.140
94.140.14.141
IPv6:
2a10:50c0::1:ff
2a10:50c0::2:ff
Family protection servers
AdGuard DNS will block ads, trackers, adult content, and enable Safe Search and Safe Mode, where possible.
IPv4:
94.140.14.15
94.140.15.16
IPv6:
2a10:50c0::bad1:ff
2a10:50c0::bad2:ff
Save changes.
PS4
Go to Settings → Network.
Select Set Up Internet Connection.
Choose Use Wi-Fi or Use a LAN Cable depending on your network connection.
Select Custom.
Set IP Address Settings to Automatic.
Set DHCP Host Name to Do Not Specify.
Set DNS Settings to Manual.
Change DNS addresses to the addresses of one of the servers below.
Default servers
AdGuard DNS will block ads and trackers.
94.140.14.14
94.140.15.15
Non-filtering servers
AdGuard DNS will not block ads, trackers, or any other DNS requests.
94.140.14.140
94.140.14.141
Family protection servers
AdGuard DNS will block ads, trackers, adult content, and enable Safe Search and Safe Mode, where possible.
94.140.14.15
94.140.15.16
If your game console supports IPv6 addresses, add them as well.
Default servers
AdGuard DNS will block ads and trackers.
2a10:50c0::ad1:ff
2a10:50c0::ad2:ff
Non-filtering servers
AdGuard DNS will not block ads, trackers, or any other DNS requests.
2a10:50c0::1:ff
2a10:50c0::2:ff
Family protection servers
AdGuard DNS will block ads, trackers, adult content, and enable Safe Search and Safe Mode, where possible.
2a10:50c0::bad1:ff
2a10:50c0::bad2:ff
Set MTU Settings to Automatic.
Set Proxy Server to Do Not Use.
PS5
Turn on your PS5 console and sign in to your account.
From the PS5 home screen, select the Settings icon (gear icon) located in the top right corner of the screen.
In the Settings menu, select Network.
Under Network, select Settings.
Choose your network and select Set Up Internet Connection.
Choose Custom and then select DNS Settings.
Select Manual and then enter the primary DNS server address:
Default servers
AdGuard DNS will block ads and trackers.
94.140.14.14
94.140.15.15
Non-filtering servers
AdGuard DNS will not block ads, trackers, or any other DNS requests.
94.140.14.140
94.140.14.141
Family protection servers
AdGuard DNS will block ads, trackers, and adult content and enable Safe Search and Safe Mode, where possible.
94.140.14.15
94.140.15.16
(Optional) Enter the secondary DNS server address. This is a backup DNS server that your PS5 will use if the primary DNS server is unavailable:
Default servers
AdGuard DNS will block ads and trackers.
94.140.14.14
94.140.15.15
Non-filtering servers
AdGuard DNS will not block ads, trackers, or any other DNS requests.
94.140.14.140
94.140.14.141
Family protection servers
AdGuard DNS will block ads, trackers, and adult content and enable Safe Search and Safe Mode, where possible.
94.140.14.15
94.140.15.16
If your console supports IPv6, add them as well.
Default servers
AdGuard DNS will block ads and trackers.
2a10:50c0::ad1:ff
2a10:50c0::ad2:ff
Non-filtering servers
AdGuard DNS will not block ads, trackers, or any other DNS requests.
2a10:50c0::1:ff
2a10:50c0::2:ff
Family protection servers
AdGuard DNS will block ads, trackers, and adult content and enable Safe Search and Safe Mode, where possible.
2a10:50c0::bad1:ff
2a10:50c0::bad2:ff
Select Next to continue.
On the next screen, select Automatic for MTU settings.
On the Proxy Server screen, select Do Not Use.
Select Test Internet Connection to test your new DNS settings.
Once the test is complete and you see Internet Connection: Successful, select Confirm to save your settings.
Restart your PS5 console to apply the changes.
Xbox
Press the Xbox button on your controller to open the guide.
Select Profile & system → Settings → General → Network Settings.
From the Network screen options, go to Advanced Settings → DNS Settings.
Select Manual.
Change DNS addresses to the addresses of one of the servers below.
Default servers
AdGuard DNS will block ads and trackers.
94.140.14.14
94.140.15.15
Non-filtering servers
AdGuard DNS will not block ads, trackers, or any other DNS requests.
94.140.14.140
94.140.14.141
Family protection servers
AdGuard DNS will block ads, trackers, adult content, and enable Safe Search and Safe Mode, where possible.
94.140.14.15
94.140.15.16
If your game console supports IPv6 addresses, add them as well.
Default servers
AdGuard DNS will block ads and trackers.
2a10:50c0::ad1:ff
2a10:50c0::ad2:ff
Non-filtering servers
AdGuard DNS will not block ads, trackers, or any other DNS requests.
2a10:50c0::1:ff
2a10:50c0::2:ff
Family protection servers
AdGuard DNS will block ads, trackers, adult content, and enable Safe Search and Safe Mode, where possible.
2a10:50c0::bad1:ff
2a10:50c0::bad2:ff
Press B to confirm changes and exit the menu.
Nintendo 3DS
Applies to: New Nintendo 3DS, New Nintendo 3DS XL, New Nintendo 2DS XL, Nintendo 3DS, Nintendo 3DS XL, and Nintendo 2DS.
From the Home menu, select System Settings.
Go to Internet Settings → Connection Settings.
Select the connection file, then select Change Settings.
Select DNS, then select Set Up.
Set Auto-Obtain DNS to No.
Select Detailed Setup, then Primary DNS. Hold down the left arrow to delete the existing DNS.
Enter the address of one of the servers below. Select OK to return to the DNS screen. Similarly, enter Secondary DNS.
Default servers
AdGuard DNS will block ads and trackers.
94.140.14.14
94.140.15.15
Non-filtering servers
AdGuard DNS will not block ads, trackers, or any other DNS requests.
94.140.14.140
94.140.14.141
Family protection servers
AdGuard DNS will block ads, trackers, adult content, and enable Safe Search and Safe Mode, where possible.
94.140.14.15
94.140.15.16
Press Save, then OK.
Nintendo Switch
Turn on your Nintendo Switch console and go to the Home Menu.
Go to System Settings → Internet.
Select the Wi-Fi network for which you want to change the DNS settings.
Click Change Settings for the selected Wi-Fi network.
Scroll down and select DNS Settings.
Select Manual and then enter the primary DNS server address.
Default servers
AdGuard DNS will block ads and trackers.
94.140.14.14
94.140.15.15
Non-filtering servers
AdGuard DNS will not block ads, trackers, or any other DNS requests.
94.140.14.140
94.140.14.141
Family protection servers
AdGuard DNS will block ads, trackers, and adult content and enable Safe Search and Safe Mode, where possible.
94.140.14.15
94.140.15.16
(Optional) Enter the secondary DNS server address. This is a backup DNS server that your Nintendo Switch will use if the primary DNS server is unavailable.
Default servers
AdGuard DNS will block ads and trackers.
94.140.14.14
94.140.15.15
Non-filtering servers
AdGuard DNS will not block ads, trackers, or any other DNS requests.
94.140.14.140
94.140.14.141
Family protection servers
AdGuard DNS will block ads, trackers, and adult content and enable Safe Search and Safe Mode, where possible.
94.140.14.15
94.140.15.16
Select Save to save your DNS settings.
Reconnect to the Wi-Fi network to apply the changes.
Steam Deck
Open the Steam Deck settings by clicking on the gear icon in the upper right corner of the screen.
Click Network.
Click the gear icon next to the network connection you want to configure.
Select IPv4 or IPv6, depending on the type of network you're using.
Select Automatic (DHCP) addresses only or Automatic (DHCP).
In the DNS servers field, enter one of the following IP addresses.
Default servers
AdGuard DNS will block ads and trackers.
94.140.14.14
94.140.15.15
Non-filtering servers
AdGuard DNS will not block ads, trackers, or any other DNS requests.
94.140.14.140
94.140.14.141
Family protection servers
AdGuard DNS will block ads, trackers, and adult content and enable Safe Search and Safe Mode, where possible.
94.140.14.15
94.140.15.16
If your console supports IPv6, add them as well.
Default servers
AdGuard DNS will block ads and trackers.
2a10:50c0::ad1:ff
2a10:50c0::ad2:ff
Non-filtering servers
AdGuard DNS will not block ads, trackers, or any other DNS requests.
2a10:50c0::1:ff
2a10:50c0::2:ff
Family protection servers
AdGuard DNS will block ads, trackers, and adult content and enable Safe Search and Safe Mode, where possible.
2a10:50c0::bad1:ff
2a10:50c0::bad2:ff
Save the changes.
Samsung Smart TV
Open Settings → Network.
Select Network Status → IP Settings.
Click DNS setting, then select Enter manually from the dropdown menu.
In the DNS Server field, enter one of the following DNS server addresses.
Default servers
AdGuard DNS will block ads and trackers.
94.140.14.14
94.140.15.15
Non-filtering servers
AdGuard DNS will not block ads, trackers, or any other DNS requests.
94.140.14.140
94.140.14.141
Family protection servers
AdGuard DNS will block ads, trackers, and adult content and enable Safe Search and Safe Mode, where possible.
94.140.14.15
94.140.15.16
Save the changes and restart your Samsung TV.
LG
Open Settings → All Settings.
Click Network and select your Wi-Fi network.
Open Advanced Wi-Fi settings and click Edit.
Uncheck Set automatically.
In the DNS Server field, enter one of the following DNS server addresses.
Default servers
AdGuard DNS will block ads and trackers.
94.140.14.14
94.140.15.15
Non-filtering servers
AdGuard DNS will not block ads, trackers, or any other DNS requests.
94.140.14.140
94.140.14.141
Family protection servers
AdGuard DNS will block ads, trackers, and adult content and enable Safe Search and Safe Mode, where possible.
94.140.14.15
94.140.15.16
Click Connect to save the changes.
Android TV
Open Settings → Network & Internet.
Select your Wi-Fi network or wired connection.
Write down the IP address of your device. You can find it under IP address.
Scroll down to IP settings and select Static.
Enter the IP address of your device.
For Gateway, enter your router’s IP address. You can usually find it in your router's settings or by contacting your Internet service provider.
For Network prefix length, enter:
24For DNS 1, enter the primary DNS server address.
Default servers
AdGuard DNS will block ads and trackers.
94.140.14.14
94.140.15.15
Non-filtering servers
AdGuard DNS will not block ads, trackers, or any other DNS requests.
94.140.14.140
94.140.14.141
Family protection servers
AdGuard DNS will block ads, trackers, and adult content and enable Safe Search and Safe Mode, where possible.
94.140.14.15
94.140.15.16
For DNS 2, enter the secondary DNS server address. This is a backup DNS server that your Android TV box will use if the primary DNS server is unavailable.
Default servers
AdGuard DNS will block ads and trackers.
94.140.14.14
94.140.15.15
Non-filtering servers
AdGuard DNS will not block ads, trackers, or any other DNS requests.
94.140.14.140
94.140.14.141
Family protection servers
AdGuard DNS will block ads, trackers, and adult content and enable Safe Search and Safe Mode, where possible.
94.140.14.15
94.140.15.16
Save the changes.
Apple TV
Open Settings → Network.
Select your Wi-Fi network or wired connection.
Click Configure DNS and choose Manual.
Enter one of the following DNS server addresses.
Default servers
AdGuard DNS will block ads and trackers.
94.140.14.14
94.140.15.15
Non-filtering servers
AdGuard DNS will not block ads, trackers, or any other DNS requests.
94.140.14.140
94.140.14.141
Family protection servers
AdGuard DNS will block ads, trackers, and adult content and enable Safe Search and Safe Mode, where possible.
94.140.14.15
94.140.15.16
Click Done.
Fire TV
Open Settings → My Fire TV → About → Network.
Write down the IP address, gateway, and subnet mask.
Return to Settings and click Network.
Select your network and click the remote's menu button (☰) to forget it.
Select the network again and enter your password. Instead of clicking Connect, click Advanced.
Enter the written down IP address and gateway.
For Subnet Mask, if your subnet mask is 255.255.255.0, enter:
24 if your subnet mask is 255.255.255.255: 32For DNS 1, enter the primary DNS server address.
Default servers
AdGuard DNS will block ads and trackers.
94.140.14.14
94.140.15.15
Non-filtering servers
AdGuard DNS will not block ads, trackers, or any other DNS requests.
94.140.14.140
94.140.14.141
Family protection servers
AdGuard DNS will block ads, trackers, and adult content and enable Safe Search and Safe Mode, where possible.
94.140.14.15
94.140.15.16
For DNS 2, enter the secondary DNS server address. This is a backup DNS server that your Fire TV will use if the primary DNS server is unavailable.
Default servers
AdGuard DNS will block ads and trackers.
94.140.14.14
94.140.15.15
Non-filtering servers
AdGuard DNS will not block ads, trackers, or any other DNS requests.
94.140.14.140
94.140.14.141
Family protection servers
AdGuard DNS will block ads, trackers, and adult content and enable Safe Search and Safe Mode, where possible.
94.140.14.15
94.140.15.16
Save the changes.
Our server addresses
If you already know how to set up DNS on your device, use these addresses
DNS-over-HTTPS
Default server
AdGuard DNS will block ads and trackers.
Non-filtering server
AdGuard DNS will not block ads, trackers, or any other DNS requests.
Family protection server
AdGuard DNS will block ads, trackers, adult content, and enable Safe Search and Safe Mode, where possible.
DNS-over-TLS
Default server
AdGuard DNS will block ads and trackers.
tls://dns.adguard-dns.com
Non-filtering server
AdGuard DNS will not block ads, trackers, or any other DNS requests.
tls://unfiltered.adguard-dns.com
Family protection server
AdGuard DNS will block ads, trackers, adult content, and enable Safe Search and Safe Mode, where possible.
tls://family.adguard-dns.com
DNS-over-QUIC
Default server
AdGuard DNS will block ads and trackers.
quic://dns.adguard-dns.com
Non-filtering server
AdGuard DNS will not block ads, trackers, or any other DNS requests.
quic://unfiltered.adguard-dns.com
Family protection server
AdGuard DNS will block ads, trackers, adult content, and enable Safe Search and Safe Mode, where possible.
quic://family.adguard-dns.com
DNSCrypt
Default server
AdGuard DNS will block ads and trackers.
sdns://AQMAAAAAAAAAETk0LjE0MC4xNC4xNDo1NDQzINErR_JS3PLCu_iZEIbq95zkSV2LFsigxDIuUso_OQhzIjIuZG5zY3J5cHQuZGVmYXVsdC5uczEuYWRndWFyZC5jb20
Non-filtering server
AdGuard DNS will not block ads, trackers, or any other DNS requests.
sdns://AQMAAAAAAAAAEjk0LjE0MC4xNC4xNDA6NTQ0MyC16ETWuDo-PhJo62gfvqcN48X6aNvWiBQdvy7AZrLa-iUyLmRuc2NyeXB0LnVuZmlsdGVyZWQubnMxLmFkZ3VhcmQuY29t
Family protection server
AdGuard DNS will block ads, trackers, adult content, and enable Safe Search and Safe Mode, where possible.
sdns://AQMAAAAAAAAAETk0LjE0MC4xNC4xNTo1NDQzILgxXdexS27jIKRw3C7Wsao5jMnlhvhdRUXWuMm1AFq6ITIuZG5zY3J5cHQuZmFtaWx5Lm5zMS5hZGd1YXJkLmNvbQ
Plain DNS
Default servers
AdGuard DNS will block ads and trackers.
IPv4:
94.140.14.14
94.140.15.15
IPv6:
2a10:50c0::ad1:ff
2a10:50c0::ad2:ff
Non-filtering servers
AdGuard DNS will not block ads, trackers, or any other DNS requests.
IPv4:
94.140.14.140
94.140.14.141
IPv6:
2a10:50c0::1:ff
2a10:50c0::2:ff
Family protection servers
AdGuard DNS will block ads, trackers, adult content, and enable Safe Search and Safe Mode, where possible.
IPv4:
94.140.14.15
94.140.15.16
IPv6:
2a10:50c0::bad1:ff
2a10:50c0::bad2:ff
Try Private AdGuard DNS
A trusted public DNS is great, but you have little control over it and can’t see what and where it’s blocking. Private DNS is a way to have your own network-level firewall and enjoy complete control over all your devices
Copied