SiteProxy is a powerful online proxy tool that leverages the latest technologies to enhance stability and compatibility. We are committed to providing simple, efficient, and secure proxy services to deliver the best internet access experience.
- Super High Performance: Replaces the traditional Express server with Hono, improving performance by 4 times for a smoother user experience.
- Cloud Deployment: Fully supports Cloudflare Worker deployment for quick and efficient service.
- AI Smart Chat: Integrates DuckDuckGo AI Chat, offering free GPT-3.5 and Claude 3, making your proxy service smarter.
- Advanced Security Protection: Supports password-controlled access, ensuring only authorized users can use the proxy, significantly enhancing security.
- Zero Configuration Use: Users need no client configuration; simply access the proxy URL to surf the global internet.
- Convenient Login: Fully supports GitHub and Telegram Web login for simple and fast operations.
- Strong Encryption: Utilizes
RSA + AESdual encryption technology to protect user login passwords and prevent man-in-the-middle attacks. - Privacy Protection: Access the global internet via the proxy URL while hiding the user's real IP to protect privacy.
- Seamless Experience: No software installation or browser configuration is needed; just use it immediately for an extremely convenient user experience.
View Principle
                                                 +----> google/youtube
                             +----------------+  |
                             |                |  |
user browser +-------------->+ siteproxy      +-------> wikipedia
                             |                |  |
                             +----------------+  |
                                                 +----> chinese forums
Caution
This project must not be used for any illegal purposes. Users are responsible for their actions.
Warning
Due to the support for multiple website logins, to reduce phishing risks, SiteProxy in version 2.0 obfuscates the code and prohibits modifying the default homepage URL.
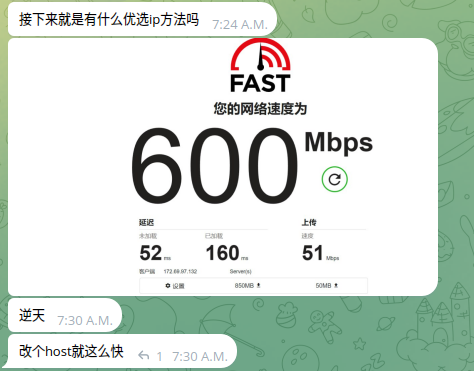
A demonstration by a Telegram user of SiteProxy deployment and speed test with optimized IPs:
- Ensure Domain Management:
- Make sure your domain is managed under Cloudflare.
- Clone Repository:
- Execute the command:
git clone https://github.com/netptop/siteproxy.git
- Execute the command:
- Edit Configuration File:
- Open the
siteproxy/build/cf_page/_worker.jsfile with a text editor. - Search and replace the string
http://localhost:5006with your proxy server domain, e.g.,https://your-proxy-domain.com(ensure to usehttps). - Search and replace the string
user22334455with your desired access password. If the password is empty, it means no password is required for access. Save the file.
- Open the
- Log in to Cloudflare:
- Go to the Workers and Pages section, choose Create a Page by Direct Upload, and upload the
siteproxy/build/cf_pagedirectory for deployment.
- Go to the Workers and Pages section, choose Create a Page by Direct Upload, and upload the
- Configure Custom Domain:
- On the Workers & Pages page, open the just-deployed Page.
- Click on Custom Domains at the top, then choose Add Custom Domain, set it to your proxy domain, and activate the domain.
- Access Proxy Service:
- Now you can access the proxy service via
https://your-proxy-domain.com/your-password/(ensure the trailing slash exists). Remember to replace the domain and password with your own.
- Now you can access the proxy service via
- Ensure Domain Management:
- Make sure your domain is managed under Cloudflare.
- Download and Edit Worker File:
- Download the
build/worker.jsfile: link, and open it with a text editor. - Search and replace the string
http://localhost:5006with your proxy server domain, e.g.,https://your-worker-domain.com(ensure to usehttps). - Search and replace the string
user22334455with your desired access password. If the password is empty, it means no password is required for access.
- Download the
- Create Worker:
- Log in to Cloudflare, go to the Workers and Pages section, and create a Worker.
- Edit the newly created Worker, copy and paste the edited
worker.jsfile content into the Worker, save and deploy it.
- Configure Custom Domain:
- On the Workers & Pages page, open the just-saved Worker.
- Click on Settings -> Triggers at the top, then choose Add Custom Domain, and set it to your proxy domain. The DNS page should show the corresponding DNS type as Worker after setting the custom domain.
- Access Proxy Service:
- Now you can access the proxy service via
https://your-worker-domain.com/your-password/(ensure the trailing slash exists, and replace with your own domain and password).
- Now you can access the proxy service via
- Create SSL Website:
- Use
certbotandnginxto create an SSL website. You can Google for specific usage. - Configure
nginx, ensuring the/etc/nginx/conf.d/default.conffile contains the following:server { server_name your-proxy.domain.name; location / { proxy_pass http://localhost:5006; } }
- Use
- Restart nginx:
- Execute the command:
sudo systemctl restart nginx
- Execute the command:
- Install Node.js v21 or Higher:
- Execute the following commands:
curl -o- https://raw.githubusercontent.com/nvm-sh/nvm/v0.39.7/install.sh | bash
source ~/.bashrc
nvm install v21
- Execute the following commands:
- Clone Repository:
- Execute the command:
git clone https://github.com/netptop/siteproxy.git
- Execute the command:
- Enter Project Directory:
- Execute the command:
cd siteproxy
- Execute the command:
- Test Run:
- Execute the command:
node bundle.js - If there are no errors, press
Ctrl+Cto end the program.
- Execute the command:
- Modify Configuration File:
- Open and modify the
config.jsonfile, as follows:{ "proxy_url": "https://your-proxy.domain.name", // Replace with your proxy server domain, ensure to use https "token_prefix": "/user-SetYourPasswordHere/", // Set the website password to prevent unauthorized access, keep the slashes. Empty means no password. "local_listen_port": 5006, // Do not modify to ensure consistency with nginx configuration "description": "Note: token_prefix is equivalent to a website password, please set it carefully. The combination of proxy_url and token_prefix is the access URL." }
- Open and modify the
- Install Forever:
- Execute the command:
npm install -g forever
- Execute the command:
- Start Application:
- Execute the command:
forever stopall && forever start bundle.js
- Execute the command:
- Access Proxy Service:
- Access your domain in the browser with the URL being the combination of
proxy_urlandtoken_prefix.
- Access your domain in the browser with the URL being the combination of
- Use Cloudflare Acceleration (Optional):
- Refer to Cloudflare's official instructions for setup.
Now, your proxy service has been successfully deployed and can be accessed through the browser.
- Configure SSL Certificate and Nginx:
- Configure the SSL certificate and Nginx for the domain, directing it to the local port 5006.
- Clone Repository:
- Execute the command:
git clone https://github.com/netptop/siteproxy.git
- Execute the command:
- Edit Configuration File:
- Open and modify the
config.jsonfile as follows:{ "proxy_url": "https://your-proxy-domain.com", // Replace with your obtained proxy server domain "token_prefix": "/user-SetYourPasswordHere/", // Set the website password to prevent unauthorized access, keep the slashes "description": "Note: token_prefix is equivalent to a website password, please set it carefully. The combination of proxy_url and token_prefix is the access URL." } - Save the file.
- Open and modify the
- Start Docker Container:
- Enter the
docker-nodesubdirectory. - Execute the command:
sudo docker compose up
- Enter the
- Access Proxy Service:
- Now you can access the proxy service via
https://your-proxy-domain.com/user-your-password/. Please replace the domain and password with your own.
- Now you can access the proxy service via
- The default homepage of netptop.com was designed by Telegram user SenZyo. Thank you for the contribution!
- Documentation was written by LAGSNES.
Telegram group: https://siteproxy.t.me E-mail: [email protected]